
Cooking a healthy dinner at home does not have to be a big production. When you are making food for two people, it is actually easier than you think to put together something balanced, tasty, and good for both of you.
These healthy dinner recipes for two are built around whole foods, real ingredients, and portions that make sense — so nothing goes to waste and nothing comes from a box.
Home-cooked meals give you full control over what goes into your food — the oils, the salt, the protein, the vegetables. That matters more than most people realize.
Couples and busy pairs who cook together or take turns in the kitchen tend to eat better, spend less money on takeout, and feel more in control of their health.
These recipes are written to be beginner-friendly and quick enough for a weeknight. Each one uses balanced macros — that means a good mix of protein, healthy carbs, and vegetables — so your body gets what it needs without extra junk.
Whether you are new to cooking or just looking for fresh dinner ideas, this guide gives you real, practical healthy dinner recipes for two you will want to make again.

How to Plan Healthy Dinners for Two on a Weekly Basis
Meal planning for two does not need to be complicated. A little bit of organization at the start of the week makes everything easier — fewer trips to the store, less food going bad, and more time enjoying dinner instead of stressing over it.
1. Pick your recipes before you shop. Choose three to four dinners at the start of each week. Look at what proteins and vegetables overlap between recipes so you can buy ingredients that work for more than one meal. For example, if two recipes use bell peppers, buy them together.
2. Make a focused grocery list. Write down only what you need for the meals you picked. Buying too much leads to spoiled food and wasted money. Stick to the list and avoid impulse buys unless they replace something on it.
3. Prep ingredients ahead of time. Spend twenty to thirty minutes on Sunday washing and chopping vegetables, cooking a batch of grains like rice or quinoa, and portioning out proteins. This makes weeknight cooking much faster.
4. Balance your meals across the week. Try to rotate between different proteins — chicken one night, fish another, plant-based the next. This gives your body a wider range of nutrients and keeps dinners from feeling repetitive.
5. Use the right storage containers. Glass containers with lids are great for storing prepped ingredients and leftovers. Label them with the date so you always know what is fresh.
6. Buy produce based on how fast it spoils. Use leafy greens and fresh fish in the first two days of the week. Save heartier vegetables like sweet potatoes, carrots, and cabbage for later in the week when they are still fresh.
7. Keep a simple pantry stocked. Olive oil, garlic, canned tomatoes, low-sodium broth, dried herbs, and canned beans are staples that make cooking faster and easier. When your pantry is ready, dinner takes half the time.
8. Adjust portions for two people from the start. Most online recipes serve four or six. Scaling them down to two means less waste and more accurate nutrition. The recipes in this guide are already written for two servings.
1. Garlic Lemon Chicken with Roasted Vegetables
Prep Time: 15 minutes | Cook Time: 35 minutes | Serves: 2
Juicy chicken breast cooked with bright lemon and roasted garlic sits on top of a colorful mix of oven-roasted vegetables. It is a complete, balanced meal with lean protein and fiber-rich vegetables — all done on one pan with simple ingredients you likely already have.

Ingredients
- 2 boneless, skinless chicken breasts (about 6 oz each)
- 3 tablespoons olive oil, divided
- 3 cloves garlic, minced
- 1 lemon, zested and juiced
- 1 teaspoon dried oregano
- ½ teaspoon paprika
- Salt and black pepper to taste
- 1 medium zucchini, sliced into half-moons
- 1 medium red bell pepper, chopped
- 1 cup broccoli florets
- ½ red onion, sliced
- Fresh parsley for garnish
Instructions
Start by preheating your oven to 425°F (220°C). Line a large baking sheet with parchment paper or lightly grease it with cooking spray. This setup is important — a hot oven and a clean pan help the vegetables roast properly rather than steam.
Pat the chicken breasts completely dry using paper towels. Removing surface moisture is a step many people skip, but it makes a big difference in how well the chicken browns. Set the dried chicken aside on a cutting board.
In a small bowl, combine 2 tablespoons of olive oil, minced garlic, lemon zest, lemon juice, dried oregano, paprika, a generous pinch of salt, and a few cracks of black pepper. Stir everything together until it forms a loose marinade. Spoon about two-thirds of this marinade over the chicken breasts, coating both sides well. Press the garlic into the surface of the meat so the flavor really gets into the chicken. Set the chicken aside to rest while you prepare the vegetables — even five to ten minutes of resting in the marinade helps.
In a large mixing bowl, toss the zucchini, bell pepper, broccoli, and red onion with the remaining tablespoon of olive oil, a pinch of salt, and black pepper. Spread the vegetables out in a single layer on the prepared baking sheet. Make sure they are not piled on top of each other — crowded vegetables steam instead of roast, and you want those slightly crispy, caramelized edges.
Nestle the marinated chicken breasts directly on top of the vegetables or beside them on the pan. Pour any leftover marinade from the bowl over the chicken.
Place the baking sheet in the center rack of the hot oven. Roast everything together for 25 to 30 minutes. At the 20-minute mark, check the vegetables and stir them gently so they cook evenly on all sides. Continue roasting until the chicken reaches an internal temperature of 165°F when checked with a meat thermometer, and the vegetables are tender with slightly golden edges.
Remove the pan from the oven and let the chicken rest for five minutes before slicing or serving. This resting time lets the juices redistribute inside the meat so the chicken stays moist when you cut into it.
To serve, divide the roasted vegetables between two plates and place a whole chicken breast or sliced chicken on top. Squeeze a little extra fresh lemon juice over everything and garnish with chopped fresh parsley. Serve immediately while everything is still hot and fragrant.
2. Grilled Salmon with Asparagus and Quinoa
Prep Time: 10 minutes | Cook Time: 25 minutes | Serves: 2
Salmon fillets seasoned with herbs sit alongside crisp grilled asparagus and fluffy quinoa cooked in light broth. Packed with omega-3 fatty acids, plant protein, and fiber, this meal covers all the nutrition bases in one clean, satisfying plate.
Ingredients
- 2 salmon fillets (about 5–6 oz each)
- 1 tablespoon olive oil
- 1 teaspoon garlic powder
- 1 teaspoon dried dill or fresh dill, chopped
- Salt and black pepper to taste
- 1 bunch asparagus, woody ends trimmed
- ½ cup dry quinoa
- 1 cup low-sodium vegetable or chicken broth
- 1 lemon, sliced into rounds
- 1 teaspoon butter or olive oil (for quinoa)
Instructions
Begin by cooking the quinoa, since it takes the longest. Rinse the dry quinoa under cold running water using a fine mesh strainer. This removes the natural coating on quinoa called saponin, which can make it taste slightly bitter if not rinsed. Add the rinsed quinoa to a small saucepan with the cup of broth. Bring it to a boil over medium-high heat, then reduce the heat to low, cover the pot with a lid, and let it simmer for 15 minutes. After 15 minutes, turn off the heat and leave the lid on for another five minutes. This steaming step finishes the cooking without any sticking. Fluff the quinoa with a fork and stir in a teaspoon of butter or olive oil along with a pinch of salt and pepper. Set it aside, covered, to stay warm.
While the quinoa is cooking, prepare the salmon and asparagus. Pat the salmon fillets dry on both sides. Drizzle olive oil over both fillets and season generously with garlic powder, dill, salt, and black pepper. Press the seasoning gently into the flesh so it sticks well.
Heat a grill pan or outdoor grill over medium-high heat. Once hot, lightly oil the grates or the surface of the pan. Place the asparagus spears on the grill first. Cook them for three to four minutes, turning them halfway through, until they are bright green with light grill marks and just tender. Remove and set aside.
Add the seasoned salmon fillets to the same hot grill, skin-side down. Let them cook undisturbed for four minutes — resist the urge to move them, as this allows a proper crust to form. Carefully flip each fillet and cook for another three to four minutes depending on the thickness. Salmon is done when it flakes easily with a fork and the center is opaque with just a hint of pinkness remaining. Avoid overcooking it, as salmon dries out quickly past the ideal temperature.
To plate, spoon a portion of warm quinoa onto each plate. Place a salmon fillet on top or beside the quinoa and arrange the grilled asparagus alongside. Add a couple of lemon rounds for both presentation and flavor — a squeeze of fresh lemon over the salmon right before eating brightens every bite.
3. Chicken Stir-Fry with Broccoli and Bell Peppers
Prep Time: 15 minutes | Cook Time: 15 minutes | Serves: 2
A fast, colorful stir-fry packed with tender chicken strips, crunchy broccoli, and sweet bell peppers coated in a savory sauce. Ready in under 30 minutes, this is one of those healthy dinner recipes for two that works perfectly on a busy weeknight.
Ingredients
- 2 boneless, skinless chicken breasts, sliced thin
- 2 tablespoons low-sodium soy sauce
- 1 tablespoon oyster sauce (optional)
- 1 tablespoon sesame oil
- 1 teaspoon cornstarch
- 1 tablespoon vegetable oil
- 2 cups broccoli florets
- 1 red bell pepper, sliced thin
- 1 yellow bell pepper, sliced thin
- 3 cloves garlic, minced
- 1 teaspoon fresh ginger, grated
- 2 tablespoons water
- Cooked brown rice or noodles for serving
- Sesame seeds for garnish (optional)
Instructions
Start by preparing the sauce and marinating the chicken. In a small bowl, combine soy sauce, oyster sauce, sesame oil, and cornstarch. Stir until the cornstarch dissolves completely with no lumps. Add the thinly sliced chicken strips to this mixture and toss to coat evenly. Let the chicken sit in the marinade for at least ten minutes while you prep the vegetables. The cornstarch helps the sauce cling to the chicken and gives it a slightly glossy finish once cooked.
Prepare all your vegetables before turning on the stove. Stir-frying moves fast, and having everything ready before the pan gets hot is the key to a good stir-fry. Slice the bell peppers into thin strips, cut the broccoli into small, even florets, mince the garlic, and grate the ginger.
Heat a large wok or heavy skillet over high heat until it is very hot — almost smoking. Add the vegetable oil and swirl it around to coat the pan. Add the marinated chicken strips in a single layer. Cook without stirring for two minutes so the chicken gets a slight sear, then stir and toss for another two to three minutes until the chicken is cooked through and golden in spots. Remove the chicken from the pan and set it aside.
In the same pan, add a tiny bit more oil if needed. Add the garlic and ginger and stir quickly for about 30 seconds — do not let them burn. Add the broccoli first, since it takes longer to cook. Toss the broccoli in the hot pan for two minutes, then add two tablespoons of water to create a quick steam. This helps the broccoli cook through without burning. Add the bell pepper strips and stir everything together for another two minutes until the vegetables are bright, slightly tender but still have a good crunch.
Return the cooked chicken to the pan along with any juices that collected on the plate. Toss everything together over high heat for one final minute so the sauce coats everything evenly. Taste and adjust with a small splash more soy sauce if needed.
Serve immediately over warm brown rice or noodles. Sprinkle sesame seeds on top for a little crunch and a finished look.
4. Mediterranean Chickpea Salad Bowl
Prep Time: 15 minutes | Cook Time: 0 minutes | Serves: 2
A no-cook bowl loaded with protein-rich chickpeas, fresh cucumber, ripe tomatoes, olives, and creamy feta cheese tossed in a bright lemon-herb dressing. Light, filling, and endlessly refreshing — a great plant-based option in any rotation of healthy dinner recipes for two.
Ingredients
- 1 can (15 oz) chickpeas, drained and rinsed
- 1 cup cherry tomatoes, halved
- 1 medium cucumber, diced
- ½ red onion, finely diced
- ¼ cup Kalamata olives, pitted and halved
- ¼ cup crumbled feta cheese
- 2 tablespoons fresh parsley, chopped
- 2 tablespoons fresh lemon juice
- 2 tablespoons extra-virgin olive oil
- ½ teaspoon dried oregano
- Salt and black pepper to taste
- Optional: 2 cups arugula or romaine lettuce as a base
Instructions
Begin by draining the canned chickpeas through a colander and rinsing them well under cold running water. This removes the thick liquid from the can and any excess sodium. Shake the colander gently to drain off as much water as possible. Spread the chickpeas out on a paper towel and pat them dry so they do not water down the dressing later.
Prepare all the fresh vegetables next. Halve the cherry tomatoes and place them in a large mixing bowl. Dice the cucumber into small, even pieces — no need to peel it unless you prefer a softer texture. Add the cucumber to the bowl along with the finely diced red onion. If you find raw red onion a bit sharp, you can soak the diced pieces in cold water for five minutes, then drain them before adding. This mellows the flavor noticeably.
Add the halved olives and drained chickpeas to the bowl with the vegetables. Toss everything together gently so the ingredients are distributed evenly.
Make the dressing directly in the bowl or in a separate small jar. Combine lemon juice, extra-virgin olive oil, dried oregano, salt, and black pepper. If making it in a jar, shake it with the lid on until emulsified. Pour the dressing over the salad and toss to coat every ingredient.
Add the crumbled feta cheese and chopped fresh parsley last, folding them in gently so the feta does not break down completely. You want visible pieces of feta throughout the bowl.
To serve, place a layer of arugula or romaine on the bottom of each bowl if using a leafy base. Spoon the dressed chickpea salad on top. Taste once more and add extra lemon or a pinch of salt if needed. Serve right away or let it sit for ten minutes so the flavors meld together.
5. Turkey and Spinach Stuffed Bell Peppers
Prep Time: 20 minutes | Cook Time: 40 minutes | Serves: 2
Four halved bell peppers filled with seasoned ground turkey, fresh spinach, and a touch of tomato sauce, then baked until golden on top. A classic comfort meal that is lower in carbs, high in protein, and one of the most satisfying healthy dinner recipes for two.

Ingredients
- 2 large bell peppers (any color), halved and seeded
- ½ lb (225g) lean ground turkey
- 1 tablespoon olive oil
- ½ cup onion, finely diced
- 3 cloves garlic, minced
- 1 cup fresh spinach, roughly chopped
- ½ cup canned crushed tomatoes
- ½ teaspoon cumin
- ½ teaspoon paprika
- Salt and black pepper to taste
- ¼ cup shredded mozzarella or cheddar cheese
- Fresh basil or parsley for garnish
Instructions
Preheat your oven to 375°F (190°C). Lightly grease a baking dish large enough to hold four bell pepper halves snugly. The sides of the dish help hold the peppers upright while they bake, so choose the right size.
Slice the bell peppers in half from stem to base and remove all the seeds and white membrane from inside. Rinse them under cold water and pat dry. Place them cut-side up in the prepared baking dish and set aside.
Heat olive oil in a medium skillet over medium heat. Add the diced onion and cook, stirring occasionally, for about four minutes until soft and starting to turn translucent. Add the minced garlic and stir for another minute until fragrant — you will smell it right away when it hits the pan.
Add the ground turkey to the pan. Break it apart using a wooden spoon or spatula as it cooks. Continue cooking and breaking the meat into small crumbles for about six to seven minutes until no pink remains. Drain any excess fat from the pan by tilting it and spooning it out, or blotting with a paper towel.
Add the crushed tomatoes, cumin, paprika, salt, and black pepper to the cooked turkey. Stir everything together and let it simmer on low heat for three to four minutes so the tomato sauce reduces slightly and coats the meat. Add the chopped spinach and fold it into the turkey mixture. Stir for about two minutes until the spinach wilts down and becomes fully incorporated.
Spoon the turkey and spinach filling generously into each bell pepper half, pressing it down slightly to pack it in. Divide the filling as evenly as possible among the four halves. Top each pepper with a pinch of shredded cheese.
Cover the baking dish loosely with aluminum foil and place in the preheated oven. Bake for 25 minutes, then remove the foil and bake for another ten minutes until the cheese is melted and the tops are lightly golden. The peppers should be tender when pierced with a fork but still holding their shape.
Remove from the oven and let rest for five minutes before serving. Garnish with fresh basil or parsley and serve two halves per person.
6. Zucchini Noodles with Pesto and Grilled Shrimp
Prep Time: 15 minutes | Cook Time: 10 minutes | Serves: 2
Spiralized zucchini replaces pasta in this light, green-forward bowl topped with fresh basil pesto and perfectly grilled shrimp. Low in carbs and high in flavor, this dish proves that eating well does not mean giving up meals you love.
Ingredients
- 2 medium zucchini, spiralized or peeled into noodles
- ½ lb (225g) large shrimp, peeled and deveined
- 1 tablespoon olive oil
- Salt, pepper, and garlic powder to taste
- ¼ teaspoon red pepper flakes (optional)
For the pesto:
- 1 cup fresh basil leaves, packed
- 2 tablespoons pine nuts (or walnuts)
- 1 small clove garlic
- 2 tablespoons grated Parmesan
- 3 tablespoons extra-virgin olive oil
- 1 tablespoon lemon juice
- Salt to taste
Instructions
Start by making the pesto so it is ready to go when everything else is done. Add the fresh basil leaves, pine nuts, garlic clove, and Parmesan to a food processor or blender. Pulse a few times to break everything down roughly. With the machine running, slowly drizzle in the olive oil through the top opening. Process until the pesto is smooth but still has a little texture — you do not want it completely liquefied. Add the lemon juice and a pinch of salt, then taste and adjust. If the pesto is too thick, add a teaspoon of water or more olive oil and pulse again. Scrape it into a bowl and set aside.
Spiralize the zucchini using a spiralizer or a vegetable peeler to make long, thin noodle-like strips. Lay the zucchini noodles on a paper towel and sprinkle lightly with salt. Let them rest for five minutes — the salt draws out excess moisture from the zucchini, which prevents the finished dish from becoming watery. After five minutes, blot the noodles dry with another paper towel and set aside.
Season the shrimp with olive oil, a pinch of salt, pepper, garlic powder, and red pepper flakes if using. Toss to coat evenly.
Heat a grill pan or regular skillet over medium-high heat. Once hot, add the shrimp in a single layer. Cook for one and a half to two minutes per side until they turn pink and curl into a loose C-shape — that means they are cooked perfectly. Do not overcook them or they become rubbery. Remove the shrimp from the pan and set aside.
In the same pan over medium heat, add the zucchini noodles. Toss them in the pan for just two to three minutes — you want them warmed through and slightly softened but not mushy or soggy. Remove from heat immediately.
Transfer the warm zucchini noodles to two bowls. Spoon a generous amount of pesto over each bowl and toss lightly to coat the noodles. Top with the grilled shrimp, dividing them evenly. Serve right away with extra Parmesan on the side.
7. Baked Honey Mustard Chicken Thighs
Prep Time: 10 minutes | Cook Time: 35 minutes | Serves: 2
Bone-in chicken thighs glazed in a sticky, sweet, and tangy honey mustard sauce, baked until the skin crisps up and the glaze caramelizes. Juicy, flavorful, and incredibly easy — perfect for a relaxed weeknight dinner that feels a little special.
Ingredients
- 4 bone-in, skin-on chicken thighs (or boneless if preferred)
- 2 tablespoons Dijon mustard
- 1 tablespoon whole grain mustard
- 2 tablespoons honey
- 1 tablespoon olive oil
- 2 cloves garlic, minced
- ½ teaspoon dried thyme
- Salt and black pepper to taste
- Fresh thyme or parsley for garnish
Instructions
Preheat the oven to 400°F (200°C). Line a baking dish or oven-safe skillet with parchment paper or lightly grease it to prevent sticking. Pat the chicken thighs completely dry using paper towels. Dry skin is the first step toward getting that golden, crispy exterior — any moisture on the surface will steam instead of crisp.
Season the chicken on both sides with salt and black pepper. Be generous — seasoning under the skin as well as on top makes a noticeable difference in flavor.
In a small bowl, whisk together the Dijon mustard, whole grain mustard, honey, olive oil, minced garlic, and dried thyme until smooth and well combined. Taste the glaze — it should be a balance of sweet, tangy, and savory. Adjust by adding a tiny bit more honey if you want it sweeter or a squeeze of lemon juice for more brightness.
Arrange the chicken thighs skin-side up in the prepared baking dish. Spoon or brush the honey mustard glaze generously over each piece, making sure to coat the top and sides. Pour any remaining glaze around the chicken in the dish — it will bubble and become a sauce as it cooks.
Place the dish in the center of the preheated oven. Bake uncovered for 30 to 35 minutes, basting the chicken with the pan juices once around the 20-minute mark. This extra layer of glaze deepens the caramelization on top. The chicken is done when the skin is golden brown and slightly sticky, and an instant-read thermometer inserted into the thickest part reads 165°F.
Remove the dish from the oven and let the chicken rest for five minutes before serving. This short rest time keeps the juices locked inside so every bite stays tender.
Spoon the pan sauce over the chicken when plating. Garnish with fresh thyme leaves or chopped parsley. Serve alongside steamed green beans, roasted sweet potatoes, or a simple salad.
8. Vegetable Lentil Soup for Two
Prep Time: 15 minutes | Cook Time: 35 minutes | Serves: 2
A hearty, warming bowl of red lentils simmered with carrots, celery, tomatoes, and aromatic spices. Naturally vegan, high in plant protein, and rich in fiber — this soup is simple, nourishing, and one of the most comforting healthy dinner recipes for two on a cold evening.
Ingredients
- ½ cup dry red lentils, rinsed
- 1 tablespoon olive oil
- ½ onion, diced
- 2 cloves garlic, minced
- 2 medium carrots, peeled and diced
- 2 stalks celery, sliced
- 1 cup canned diced tomatoes
- 2½ cups low-sodium vegetable broth
- 1 teaspoon cumin
- ½ teaspoon turmeric
- ½ teaspoon smoked paprika
- Salt and pepper to taste
- Fresh lemon juice to finish
- Fresh parsley for garnish
Instructions
Begin by rinsing the red lentils in a fine mesh strainer under cold running water. Red lentils do not need to be soaked, but rinsing removes surface starch and any debris. Let them drain and set aside.
Heat olive oil in a medium saucepan over medium heat. Add the diced onion and a pinch of salt. Cook, stirring occasionally, for about five minutes until the onion softens and turns translucent. Stir in the minced garlic and cook for one more minute until fragrant.
Add the diced carrots and celery to the pot. Stir them around for two to three minutes just to get them coated in the oil and lightly warmed. Add the cumin, turmeric, and smoked paprika. Stir the spices directly into the vegetables for about 30 seconds — this brief toasting of the spices in the oil amplifies their flavor significantly before the liquid goes in.
Pour in the canned diced tomatoes and stir to combine with the vegetables and spices. Let the mixture cook together for two minutes before adding the broth. Pour in the vegetable broth and add the rinsed lentils. Stir everything together and bring the soup to a boil over medium-high heat.
Once boiling, reduce the heat to low and place the lid on the pot slightly ajar. Simmer for 20 to 25 minutes, stirring occasionally, until the lentils have fully softened and broken down into the broth. Red lentils dissolve as they cook, naturally thickening the soup without any extra steps. If you prefer a thinner consistency, add a splash more broth or water.
Taste the soup and season with additional salt and pepper as needed. Squeeze in a tablespoon of fresh lemon juice right at the end — the brightness cuts through the richness of the spices and lifts all the other flavors.
Ladle the soup into two deep bowls. Garnish with fresh parsley and an extra drizzle of olive oil. Serve with whole grain bread or pita on the side.
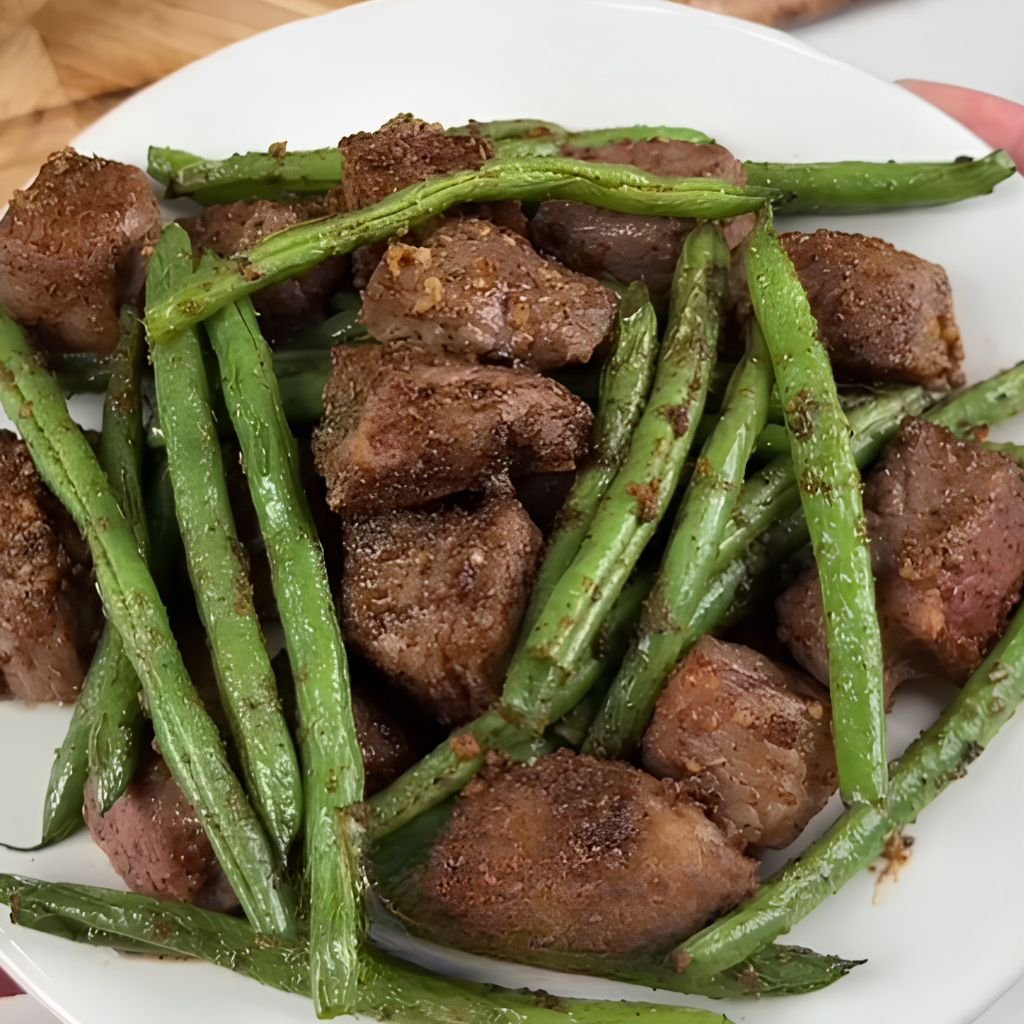
9. Garlic Butter Steak with Green Beans
Prep Time: 10 minutes | Cook Time: 20 minutes | Serves: 2
Two tender steaks cooked in a garlicky, herb-infused butter sauce served alongside crisp sautéed green beans. A restaurant-quality dinner made at home in about thirty minutes — rich in iron and protein and perfect for a special weeknight meal.
Ingredients
- 2 sirloin steaks (about 6 oz each), at room temperature
- 2 tablespoons butter, divided
- 3 cloves garlic, minced
- 1 teaspoon fresh thyme leaves (or ½ tsp dried)
- Salt and black pepper to taste
- 1 tablespoon high-heat oil (avocado or vegetable oil)
- 2 cups fresh green beans, trimmed
- ½ teaspoon garlic powder
- Squeeze of fresh lemon
Instructions
Take the steaks out of the refrigerator at least 20 to 30 minutes before cooking. Cooking a cold steak causes uneven doneness — the outside overcooks before the center has time to warm through. Room temperature steak cooks more evenly from edge to center.
Pat the steaks completely dry on both sides with paper towels. Season generously on all sides with salt and black pepper. Press the seasoning into the meat with your fingers. Good seasoning is what creates that flavorful, slightly crusty exterior.
Heat a cast iron skillet or heavy stainless steel pan over high heat for two to three minutes until it is very hot — nearly smoking. Add the high-heat oil and swirl to coat the bottom of the pan. Add the steaks carefully and press them down lightly so the entire surface makes contact with the pan.
Cook without moving the steaks for three to four minutes for medium-rare, depending on thickness. A one-inch steak takes about three and a half minutes per side for medium-rare. Flip the steaks and cook for another three to four minutes on the second side. In the last two minutes of cooking, add one tablespoon of butter, the minced garlic, and fresh thyme to the pan. As the butter melts and foams, tilt the pan slightly and use a spoon to baste the melted garlic butter continuously over the top of the steaks. This basting step adds incredible flavor and keeps the surface moist and glossy.
Transfer the steaks to a cutting board and let them rest for five full minutes before slicing or serving. Do not skip this step — cutting into a steak too soon releases all the juices onto the board instead of keeping them inside the meat.
While the steaks rest, use the same pan over medium heat. Add the second tablespoon of butter and the trimmed green beans. Toss them in the pan with garlic powder, salt, and pepper for four to five minutes until the beans are bright green and just tender with a slight bite remaining. Finish with a squeeze of lemon juice.
Serve each steak with a portion of green beans on the side. Spoon any remaining garlic butter from the pan over the steaks before serving.
10. Teriyaki Tofu with Brown Rice
Prep Time: 15 minutes (plus 20 minutes pressing) | Cook Time: 20 minutes | Serves: 2
Extra-firm tofu cubes coated in a sweet and savory homemade teriyaki sauce, pan-fried until golden and served over nutty brown rice. A satisfying plant-based dinner full of protein and complex carbohydrates — one of the most filling healthy dinner recipes for two without any meat.
Ingredients
- 1 block (14 oz) extra-firm tofu
- 3 tablespoons low-sodium soy sauce
- 1 tablespoon honey or maple syrup
- 1 teaspoon rice vinegar
- 1 teaspoon sesame oil
- 1 teaspoon cornstarch mixed with 1 tablespoon cold water
- 1 tablespoon vegetable oil
- 1 cup dry brown rice, cooked according to package
- 1 cup broccoli florets, steamed
- Sesame seeds and green onions for garnish
Instructions
Press the tofu first — this is essential for getting crispy results. Remove the tofu from its packaging and drain off the liquid. Wrap the block in two or three layers of clean paper towels or a clean kitchen towel. Set it on a plate and place something heavy on top, like a cast iron pan or a stack of books. Let it press for at least 20 minutes. The more moisture you remove, the crispier the tofu gets when it hits the hot pan. After pressing, unwrap the tofu and cut it into even one-inch cubes.
While the tofu presses, cook the brown rice according to package instructions and steam the broccoli. These take longer than the tofu, so starting them early means everything finishes around the same time.
Make the teriyaki sauce in a small saucepan. Combine soy sauce, honey or maple syrup, rice vinegar, and sesame oil. Stir over medium heat for two minutes until just starting to bubble. Add the cornstarch-water mixture and whisk constantly as the sauce thickens — this takes about one minute. Once the sauce coats the back of a spoon, remove it from the heat and set aside.
Heat vegetable oil in a large non-stick skillet or well-seasoned cast iron pan over medium-high heat. Add the tofu cubes in a single layer, making sure they are not crowded. Cook without touching them for three to four minutes on the first side until deep golden brown. Flip each cube and cook another three minutes on the second side. Continue turning to brown two or three more sides — the goal is golden, slightly crispy tofu on multiple surfaces.
Once the tofu is well browned, pour the teriyaki sauce over it in the pan. Toss gently to coat every piece. The sauce will bubble and thicken quickly around the tofu. Cook for one more minute so the glaze sticks, then remove from heat.
Serve the teriyaki tofu over warm brown rice with steamed broccoli on the side. Spoon any extra sauce from the pan over the rice. Garnish with sesame seeds and sliced green onions.
11. Spicy Shrimp Tacos with Cabbage Slaw
Prep Time: 20 minutes | Cook Time: 10 minutes | Serves: 2
Juicy seasoned shrimp piled into warm tortillas with a cool, tangy cabbage slaw and a drizzle of lime crema. Bright, bold, and ready in under 30 minutes — a crowd-pleasing option from the list of healthy dinner recipes for two that never gets old.
Ingredients
- ½ lb (225g) medium shrimp, peeled and deveined
- 1 teaspoon chili powder
- ½ teaspoon cumin
- ¼ teaspoon cayenne pepper
- Salt to taste
- 1 tablespoon olive oil
- 4 small corn or flour tortillas
For the slaw:
- 1 cup shredded purple or green cabbage
- 1 tablespoon lime juice
- 1 teaspoon apple cider vinegar
- 1 teaspoon honey
- Salt to taste
For the lime crema:
- 3 tablespoons plain Greek yogurt
- 1 tablespoon lime juice
- 1 small clove garlic, minced
- Pinch of salt
Toppings: sliced avocado, fresh cilantro, extra lime wedges
Instructions
Start with the slaw since it benefits from a little resting time in the fridge. Combine the shredded cabbage in a bowl with lime juice, apple cider vinegar, honey, and a pinch of salt. Toss everything together until the cabbage is evenly coated. Taste and adjust the lime or honey to your liking. The slaw should be tangy with just a slight sweetness. Place it in the refrigerator while you prepare everything else — even ten minutes of resting softens the cabbage slightly and lets the flavors develop.
Make the lime crema by mixing Greek yogurt, lime juice, minced garlic, and a pinch of salt in a small bowl. Stir until smooth and creamy. Taste and add more lime if you prefer a brighter flavor. Set aside.
Pat the shrimp dry using paper towels. Place them in a bowl and toss with chili powder, cumin, cayenne, and salt until every shrimp is well coated with the spice mix.
Heat olive oil in a skillet over medium-high heat. Once the oil is hot and shimmering, add the shrimp in a single layer — do not pile them on top of each other. Cook for one and a half to two minutes on the first side without moving them. They will start to turn pink and opaque from the bottom up. Flip each shrimp and cook for one to two more minutes on the other side until fully pink and cooked through. Remove from heat immediately. Overcooked shrimp become tough and rubbery, so pull them off the heat as soon as they are done.
Warm the tortillas directly over a gas burner for about 20 seconds per side, or in a dry skillet over medium heat for 30 seconds per side, until soft and slightly charred on the edges.
Assemble the tacos by spreading a spoonful of lime crema on each tortilla. Add a small pile of slaw, then top with three to four shrimp per taco. Add sliced avocado and fresh cilantro on top. Finish with a squeeze of fresh lime juice. Serve two tacos per person.
12. Baked Cod with Lemon and Herbs
Prep Time: 10 minutes | Cook Time: 20 minutes | Serves: 2
Mild, flaky cod fillets baked with a bright lemon and fresh herb topping — simple, clean, and incredibly easy to prepare. Cod is a lean white fish loaded with protein and perfect for a light but satisfying dinner for two.
Ingredients
- 2 cod fillets (about 6 oz each)
- 2 tablespoons olive oil
- 2 cloves garlic, minced
- 1 tablespoon fresh parsley, chopped
- 1 tablespoon fresh dill or dried dill
- 1 lemon, sliced into thin rounds plus extra for serving
- Salt and black pepper to taste
- Pinch of red pepper flakes (optional)
- Cherry tomatoes for roasting alongside (optional)
Instructions
Preheat your oven to 400°F (200°C). Lightly coat a baking dish or rimmed baking sheet with olive oil or a thin layer of cooking spray. The fish should not stick to the pan, so make sure the surface is well coated.
Rinse the cod fillets under cold water and pat them completely dry with paper towels. Moisture on the surface of fish can cause it to steam instead of bake properly, resulting in a soft, pale exterior rather than the slightly firmer texture you want. Place the dried fillets in the prepared baking dish with a small amount of space between them.
Drizzle olive oil generously over both fillets. In a small bowl, mix together the minced garlic, chopped parsley, dill, salt, black pepper, and red pepper flakes if using. Spoon or spread this herb and garlic mixture evenly over the top surface of each fillet, pressing it gently into the fish so it adheres. Lay two or three lemon rounds on top of each fillet — the lemon slices will release juice as the fish bakes, perfuming the entire dish with a clean, bright citrus aroma.
If using cherry tomatoes, scatter them around the cod in the baking dish. They will roast at the same time and create a simple, slightly sweet side element to serve alongside the fish.
Place the dish in the preheated oven and bake for 15 to 20 minutes, depending on the thickness of the fillets. Cod is done when it turns from translucent to completely opaque and flakes easily when pressed gently with a fork. A general rule is ten minutes of baking per inch of thickness. Avoid over-baking cod — it dries out quickly once past the ideal temperature.
Remove from the oven and let the fish rest in the dish for two minutes before serving. The carryover heat will continue cooking the fish very gently. Serve each fillet directly from the dish onto warm plates, spooning any juices and roasted tomatoes over the top. Add a fresh lemon wedge on the side.
13. Quinoa and Roasted Vegetable Bowl
Prep Time: 15 minutes | Cook Time: 30 minutes | Serves: 2
Fluffy quinoa topped with a colorful medley of oven-roasted vegetables and a drizzle of tahini dressing. Naturally vegan, packed with plant protein and fiber, and flexible enough to use whatever vegetables are in your fridge.
Ingredients
- ½ cup dry quinoa, rinsed
- 1 cup vegetable broth
- 1 medium sweet potato, peeled and cubed
- 1 cup cauliflower florets
- 1 red bell pepper, sliced
- 1 small red onion, sliced
- 2 tablespoons olive oil
- ½ teaspoon garlic powder
- ½ teaspoon smoked paprika
- Salt and pepper to taste
Tahini dressing:
- 2 tablespoons tahini
- 1 tablespoon lemon juice
- 1 teaspoon garlic, minced
- 2–3 tablespoons water (to thin)
- Salt to taste
Instructions
Preheat the oven to 425°F (220°C) and line a large baking sheet with parchment paper. A hot oven is key — vegetables need high heat to caramelize on the outside while staying tender on the inside.
Prepare the vegetables by cutting them into similar-sized pieces so they roast evenly. Larger pieces like sweet potato cubes should be no bigger than one inch. In a large bowl, toss all the vegetables — sweet potato, cauliflower, bell pepper, and red onion — with olive oil, garlic powder, smoked paprika, salt, and pepper. Make sure every piece is coated in oil and seasoning.
Spread the seasoned vegetables on the lined baking sheet in a single, even layer. Do not pile them up — space between pieces allows hot air to circulate and creates roasting rather than steaming. Slide the tray into the oven and roast for 25 to 30 minutes, tossing once halfway through, until the edges are caramelized and tender when pierced with a fork. Sweet potato and cauliflower typically take a bit longer than the softer vegetables, so make sure those are fully cooked before removing the tray.
While the vegetables roast, cook the quinoa. Combine the rinsed quinoa and vegetable broth in a small saucepan. Bring to a boil, then reduce heat to low, cover, and simmer for 15 minutes. Remove from heat and let stand covered for five more minutes before fluffing with a fork and seasoning lightly with salt.
Make the tahini dressing by whisking together tahini, lemon juice, minced garlic, and enough water to create a smooth, pourable consistency. Add water one tablespoon at a time until the dressing flows easily off the whisk. Season with salt and taste — the dressing should be nutty, tangy, and savory.
To assemble, divide the warm quinoa between two bowls. Pile the roasted vegetables generously on top. Drizzle the tahini dressing over everything. Add optional toppings like fresh parsley, pumpkin seeds, or sliced avocado.
14. Chicken and Avocado Salad Wraps
Prep Time: 15 minutes | Cook Time: 15 minutes | Serves: 2
Tender grilled chicken sliced and wrapped in a whole wheat tortilla with creamy avocado, crisp lettuce, tomato, and a light Greek yogurt spread. A fresh, hand-held meal that is easy to assemble and perfect for a quick dinner.
Ingredients
- 2 boneless, skinless chicken breasts
- 1 tablespoon olive oil
- ½ teaspoon garlic powder
- ½ teaspoon onion powder
- Salt and black pepper to taste
- 2 large whole wheat tortillas
- 1 ripe avocado, sliced
- 1 cup romaine lettuce, shredded
- 1 medium tomato, sliced or diced
- 2 tablespoons plain Greek yogurt
- 1 teaspoon lemon juice
- ½ teaspoon dried herbs (dill, chives, or parsley)
Instructions
Season the chicken breasts with olive oil, garlic powder, onion powder, salt, and black pepper. Rub the seasoning all over both sides of each breast. Let the chicken sit and absorb the seasoning for five to ten minutes while you bring a skillet or grill pan to medium-high heat.
Add the seasoned chicken to the hot pan. Cook undisturbed for five to six minutes on the first side, then flip and cook another five minutes on the second side. The internal temperature should reach 165°F. If the chicken is thick, cover the pan with a lid during the last few minutes to help the heat cook through without burning the outside. Once done, transfer the chicken to a cutting board and let it rest for five minutes before slicing.
While the chicken rests, prepare the spread. Mix Greek yogurt with lemon juice and dried herbs until smooth. This yogurt spread acts as a lighter alternative to mayo and adds a pleasant tanginess. Taste and adjust the lemon or herbs to your preference.
Slice the rested chicken into thin strips across the grain — cutting against the grain shortens the muscle fibers and keeps the chicken tender rather than chewy. Slice the avocado in half, remove the pit, and cut the flesh into even slices.
Warm each tortilla in a dry skillet for 30 seconds per side or wrap in a damp paper towel and microwave for 20 seconds to make them pliable and easy to roll without cracking.
Lay a tortilla flat on a clean surface. Spread half the Greek yogurt mixture down the center. Layer shredded romaine, sliced tomato, avocado slices, and the sliced chicken on top. Season with a little extra salt and pepper if desired. Fold in the sides of the tortilla and roll it firmly from the bottom up, keeping the filling tight as you roll. Slice the wrap diagonally and serve immediately.
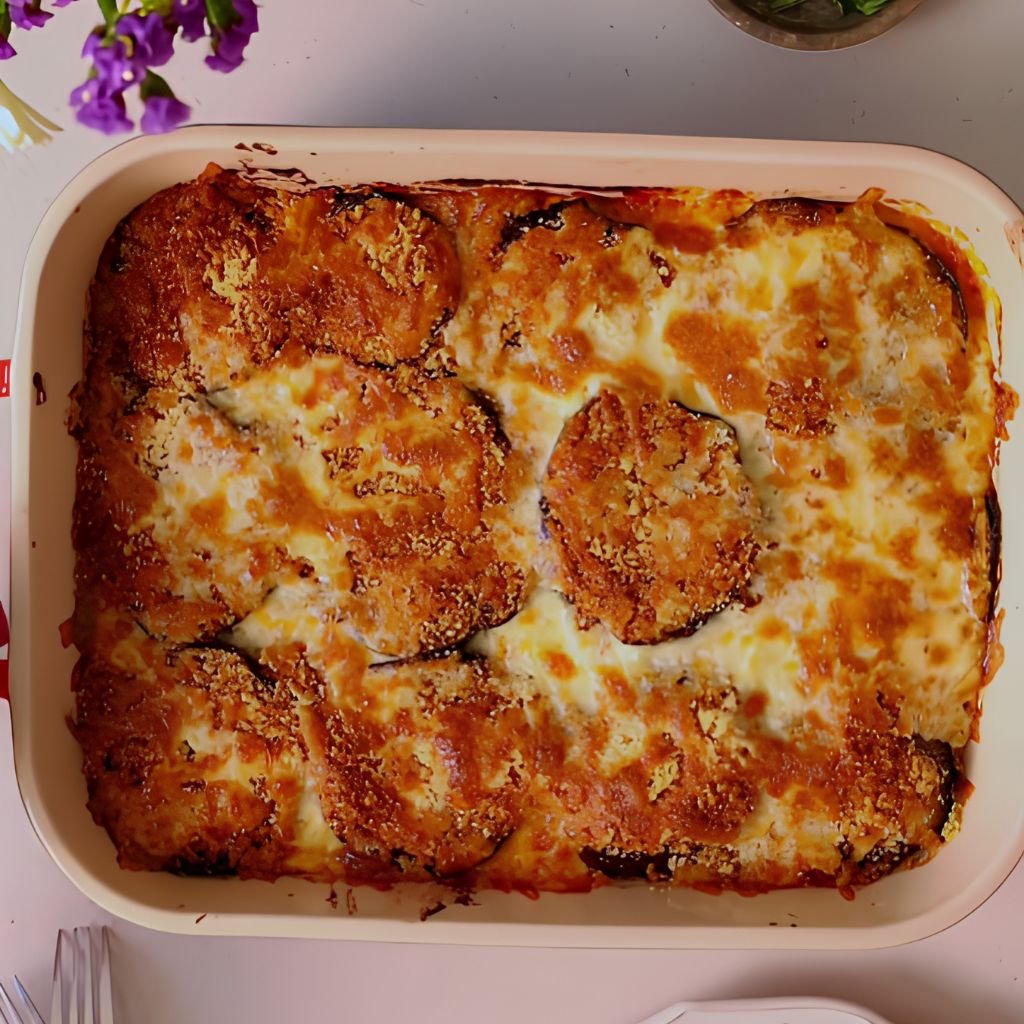
15. Eggplant Parmesan (Light Version)
Prep Time: 20 minutes | Cook Time: 40 minutes | Serves: 2
Sliced eggplant baked — not fried — with a layer of marinara sauce and melted mozzarella cheese. A lighter take on an Italian classic that keeps all the comfort and satisfying flavor without the heavy breading and deep-frying.
Ingredients
- 1 medium eggplant, sliced into ½-inch rounds
- Salt for drawing out moisture
- 2 tablespoons olive oil
- ½ teaspoon garlic powder
- ½ teaspoon dried basil
- ¾ cup marinara sauce (low-sodium)
- ½ cup part-skim shredded mozzarella
- 2 tablespoons grated Parmesan
- Fresh basil leaves for garnish
Instructions
Slice the eggplant into rounds about half an inch thick. Lay the slices out on a clean surface or paper towels and sprinkle both sides generously with salt. Let the salted eggplant sit for 15 to 20 minutes. During this time, you will notice droplets of moisture forming on the surface — this process, called sweating, draws out bitterness and excess water from the eggplant. After resting, blot each slice firmly with paper towels to remove the moisture and salt. This step makes a meaningful difference in the final texture of the dish.
Preheat the oven to 400°F (200°C). Line a large baking sheet with parchment and lightly brush or spray it with oil. Arrange the blotted eggplant slices in a single layer on the sheet. Brush the top of each slice lightly with olive oil and season with garlic powder and dried basil.
Place the tray in the oven and roast the eggplant for 20 minutes, flipping the slices once at the halfway point. The eggplant should be golden on both sides and noticeably reduced in size as the moisture cooks off. A well-roasted eggplant slice is key — under-roasted eggplant stays spongy and soft in a way that does not work well in this dish.
Remove the tray from the oven. Spoon a tablespoon of marinara sauce onto each slice and spread it to the edges. Add a generous pinch of shredded mozzarella on top of the sauce. Place the tray back in the oven for another 10 to 12 minutes, until the cheese is melted, bubbling, and starting to turn golden at the edges.
Remove from the oven and let the eggplant cool for just a couple of minutes. Serve two or three slices per person, overlapping them slightly on each plate. Sprinkle with grated Parmesan and fresh basil leaves before serving.
16. Beef and Vegetable Stir-Fry
Prep Time: 15 minutes | Cook Time: 15 minutes | Serves: 2
Thinly sliced beef tossed with snap peas, mushrooms, and carrots in a rich umami-forward sauce. Fast, filling, and better than takeout — a go-to recipe for when you need a hearty dinner on the table quickly.
Ingredients
- ½ lb (225g) sirloin or flank steak, sliced thin against the grain
- 2 tablespoons low-sodium soy sauce
- 1 tablespoon oyster sauce
- 1 teaspoon sesame oil
- 1 teaspoon cornstarch
- 1 tablespoon vegetable oil
- 1 cup snap peas
- 1 cup mushrooms, sliced
- 1 medium carrot, julienned or thinly sliced
- 3 cloves garlic, minced
- 1 teaspoon fresh ginger, grated
- 2 tablespoons water
- Cooked rice for serving
- Green onions and sesame seeds for garnish
Instructions
Slice the beef as thin as possible — placing the meat in the freezer for 15 minutes before slicing makes it firmer and much easier to cut into paper-thin pieces. Cut against the grain to shorten the muscle fibers and ensure tender results. In a bowl, toss the sliced beef with soy sauce, oyster sauce, sesame oil, and cornstarch. Mix until the beef is evenly coated and let it marinate while you prep the vegetables. The cornstarch tenderizes the beef slightly and helps the sauce cling to each slice during cooking.
Prepare all vegetables before turning the heat on — clean and halve the snap peas, slice the mushrooms, and julienne or thinly slice the carrots. Mince the garlic and grate the ginger and keep them together in a small bowl.
Heat a wok or large skillet over the highest heat your stove allows. Add vegetable oil and swirl. Once the oil begins to smoke slightly, add the beef in a single layer. Cook without stirring for one minute to let a quick sear form. Toss and stir for another one to two minutes until the beef is just cooked through — slightly pink inside is fine as it will continue cooking briefly. Remove the beef to a plate and set aside.
In the same hot pan, add the garlic and ginger. Stir for 30 seconds. Add the carrots first as they are the hardest vegetable. Toss for two minutes, then add the mushrooms and snap peas. Add two tablespoons of water to the pan — it will sizzle and create steam that helps cook the vegetables through quickly. Stir everything vigorously for two to three minutes until the vegetables are bright, glossy, and just tender.
Return the beef to the pan along with any accumulated juices. Toss everything together over high heat for one final minute until the sauce reduces slightly and everything glistens. Taste and adjust seasoning.
Serve immediately over steamed rice. Garnish with sliced green onions and sesame seeds.
17. Mediterranean Grilled Chicken Plate
Prep Time: 15 minutes (plus 30 min marinating) | Cook Time: 15 minutes | Serves: 2
Herb-marinated grilled chicken served alongside a refreshing cucumber tomato salad, creamy hummus, and warm pita. A wholesome, protein-rich plate with clean Mediterranean flavors — simple enough for weeknights and impressive enough for guests.
Ingredients
- 2 boneless, skinless chicken breasts
- 3 tablespoons olive oil, divided
- 2 tablespoons lemon juice
- 2 cloves garlic, minced
- 1 teaspoon dried oregano
- ½ teaspoon cumin
- Salt and pepper to taste
- 1 cup cherry tomatoes, halved
- 1 medium cucumber, diced
- ¼ red onion, finely diced
- 2 tablespoons fresh parsley, chopped
- 1 tablespoon red wine vinegar
- ¼ cup hummus for serving
- 2 small whole wheat pitas, warmed
Instructions
Make the marinade by whisking together two tablespoons of olive oil, lemon juice, minced garlic, dried oregano, cumin, salt, and black pepper in a shallow bowl or zip-top bag. Add the chicken breasts and turn them to coat every surface. Seal or cover and refrigerate for at least 30 minutes. If you have more time, marinating for up to two hours deepens the flavor significantly. Remove the chicken from the refrigerator 10 minutes before cooking to bring it closer to room temperature.
While the chicken marinates, make the cucumber tomato salad. Combine the halved cherry tomatoes, diced cucumber, finely diced red onion, and chopped parsley in a bowl. Drizzle with the remaining tablespoon of olive oil, red wine vinegar, and a pinch of salt and pepper. Toss gently and let it rest while you grill the chicken — the acid in the vinegar softens the onion slightly and blends the flavors together.
Heat a grill pan or outdoor grill over medium-high heat. Oil the grates lightly. Remove the chicken from the marinade, letting the excess drip off. Place the chicken on the hot grill and cook for five to six minutes per side, pressing gently to ensure even contact with the grill surface. The chicken is done when grill marks are visible, the outside is golden, and the internal temperature reads 165°F. Move the chicken to a cutting board and let it rest for five minutes.
Warm the pitas directly over a gas flame or in a dry skillet until lightly charred and soft. Slice the rested chicken at an angle into thick pieces and arrange on each plate. Add a generous spoonful of hummus, a portion of the cucumber tomato salad, and a warm pita alongside.
18. Coconut Curry Chickpeas with Rice
Prep Time: 10 minutes | Cook Time: 25 minutes | Serves: 2
Creamy coconut milk simmers with chickpeas, spinach, and aromatic curry spices to make a rich, warming bowl served over fluffy jasmine rice. Fully plant-based and naturally gluten-free, this is comfort food that also happens to be deeply nourishing.
Ingredients
- 1 can (15 oz) chickpeas, drained and rinsed
- 1 tablespoon coconut oil or olive oil
- ½ onion, diced
- 3 cloves garlic, minced
- 1 teaspoon fresh ginger, grated
- 1½ teaspoons curry powder
- ½ teaspoon turmeric
- ¼ teaspoon cayenne (adjust to taste)
- 1 cup canned diced tomatoes
- ¾ cup full-fat coconut milk
- 2 cups fresh spinach
- Salt to taste
- Fresh cilantro and lime wedges for serving
- 1 cup dry jasmine rice, cooked per package
Instructions
Start cooking the jasmine rice first so it is ready when the curry is done. Follow the package instructions — typically a 1:1.5 ratio of rice to water, brought to a boil, then covered and simmered on low for 15 minutes, then rested off the heat for five minutes.
While the rice cooks, heat coconut oil in a medium saucepan or deep skillet over medium heat. Add the diced onion and cook for four to five minutes, stirring occasionally, until soft and translucent. Add the minced garlic and grated ginger and stir for one minute until fragrant. The kitchen should smell wonderful at this point — that combination of garlic and ginger is the foundation of the curry.
Add the curry powder, turmeric, and cayenne to the pan. Stir the spices into the onion mixture and toast them for about 30 to 45 seconds, stirring constantly so they do not burn. This step briefly toasts the spices and releases their fat-soluble aromatic compounds, which makes the finished curry far more flavorful than adding spices directly to liquid.
Pour in the canned diced tomatoes with their juices. Stir and let the tomatoes cook down for three minutes, breaking any large pieces apart with your spoon. The mixture will thicken slightly.
Add the drained chickpeas and stir to coat them in the tomato and spice mixture. Pour in the coconut milk and stir everything together. Bring the curry to a gentle simmer over medium heat. Reduce the heat to low and let it cook uncovered for 10 to 12 minutes, stirring occasionally. The sauce will reduce slightly and deepen in color and flavor. Taste and adjust salt and cayenne as needed.
Add the fresh spinach to the pan. Stir it into the curry and let it wilt completely, which takes only about two minutes. The spinach adds a good amount of iron and color to the dish.
Serve the curry over warm jasmine rice in two deep bowls. Garnish with fresh cilantro and a wedge of lime. Squeezing fresh lime over the curry right before eating lifts and brightens all the flavors.
19. Baked Sweet Potato with Black Beans and Salsa
Prep Time: 10 minutes | Cook Time: 45 minutes | Serves: 2
Fluffy baked sweet potatoes split open and loaded with seasoned black beans, fresh salsa, and a dollop of Greek yogurt. Naturally vegan-adaptable, rich in fiber and potassium, and completely satisfying as a complete meal on its own.
Ingredients
- 2 medium sweet potatoes
- 1 can (15 oz) black beans, drained and rinsed
- 1 tablespoon olive oil
- ½ teaspoon cumin
- ½ teaspoon garlic powder
- Salt and black pepper to taste
- ½ cup fresh salsa or pico de gallo
- 2 tablespoons plain Greek yogurt or sour cream
- 1 tablespoon fresh lime juice
- Fresh cilantro and sliced green onions for garnish
- Optional: sliced avocado, shredded cheese
Instructions
Preheat your oven to 400°F (200°C). Scrub the sweet potatoes under running water to clean the skin thoroughly — since you are eating the whole potato, a clean skin matters. Pierce each potato five to six times all over with a fork. This allows steam to escape during baking and prevents the skin from bursting. Rub the outside of each sweet potato lightly with a small amount of olive oil and a pinch of salt.
Place the prepared sweet potatoes directly on the center rack of the oven, with a baking sheet on the rack below to catch any drips. Bake for 40 to 50 minutes depending on the size of the potatoes. A medium sweet potato (about six to eight ounces) typically takes around 45 minutes. The potatoes are done when a fork or skewer slides into the thickest part with no resistance, and the skin looks slightly puffed and wrinkled. The interior should be completely soft and fluffy.
While the sweet potatoes bake, prepare the black beans. Add the drained and rinsed black beans to a small saucepan with olive oil over medium heat. Add cumin, garlic powder, salt, and black pepper. Stir and heat the beans for five to six minutes until they are fully warmed through and the spices are fragrant. You can lightly mash a small portion of the beans against the side of the pan to create a slightly creamier texture — this is optional but makes the filling more cohesive when you spoon it into the potato.
Stir in the lime juice right at the end and remove from heat.
Once the sweet potatoes are done, remove them from the oven and let them rest for two to three minutes. Slice each potato open lengthwise and push the ends gently toward each other to open and fluff the interior. Use a fork to lightly mash and fluff the flesh inside the skin.
Spoon the warm seasoned black beans generously over the opened sweet potatoes. Top each one with fresh salsa, a spoonful of Greek yogurt, and optional toppings like sliced avocado or shredded cheese. Garnish with fresh cilantro and sliced green onions.
20. Lemon Herb Pasta with Grilled Chicken
Prep Time: 15 minutes | Cook Time: 25 minutes | Serves: 2
A light pasta tossed in a bright lemon, garlic, and fresh herb sauce topped with thinly sliced grilled chicken. Using whole wheat pasta adds fiber and nutrients, making this one of those healthy dinner recipes for two that feels indulgent but is genuinely good for you.
Ingredients
- 2 oz dry whole wheat spaghetti or linguine
- 2 boneless, skinless chicken breasts
- 1 tablespoon olive oil (for chicken)
- Salt, pepper, and Italian seasoning to taste
- 2 tablespoons extra-virgin olive oil (for sauce)
- 3 cloves garlic, thinly sliced
- Zest and juice of 1 large lemon
- ¼ cup reserved pasta cooking water
- 2 tablespoons fresh parsley, chopped
- 1 tablespoon fresh basil, chopped (or 1 tsp dried)
- 2 tablespoons grated Parmesan
- Red pepper flakes to taste
Instructions
Season the chicken breasts with olive oil, salt, black pepper, and Italian seasoning. Heat a grill pan or skillet over medium-high heat. Cook the chicken for five to six minutes per side until golden and cooked through to 165°F. Transfer to a cutting board and rest for five minutes, then slice thin.
Bring a pot of salted water to a boil. Cook the whole wheat pasta until just al dente — usually one to two minutes less than the package suggests. Before draining, scoop out a generous quarter cup of the starchy pasta cooking water and set it aside. This water is the secret to a silky, cohesive sauce that does not feel dry. Drain the pasta and set aside.
While the pasta cooks, heat extra-virgin olive oil in a large skillet over medium-low heat. Add the sliced garlic and let it cook slowly and gently for two to three minutes until golden — not brown. Low heat is important here; burnt garlic turns bitter and ruins the sauce. Add the lemon zest to the pan and stir for 30 seconds, then add the lemon juice. The mixture will sizzle. Add a pinch of red pepper flakes.
Add the drained pasta directly to the garlic-lemon sauce in the skillet. Toss quickly and pour in half the reserved pasta water. Toss everything together over medium heat as the starchy water emulsifies with the oil and creates a light coating around each strand of pasta. Add more pasta water as needed to keep the noodles sauced and moist — not watery, just lightly coated.
Remove the pan from heat. Add the fresh parsley, basil, and half the Parmesan. Toss once more. Taste and season with salt, pepper, and more lemon juice if needed.
Divide the pasta between two bowls. Fan the sliced grilled chicken on top of each serving. Sprinkle with the remaining Parmesan and a pinch of red pepper flakes.
21. Cauliflower Fried Rice with Eggs
Prep Time: 15 minutes | Cook Time: 15 minutes | Serves: 2
Grated cauliflower takes the place of white rice in this fast, low-carb stir-fry loaded with vegetables, scrambled eggs, and savory soy sauce. All the flavors of classic fried rice with a fraction of the carbohydrates and twice the vegetables.
Ingredients
- 1 small head cauliflower, grated or processed into rice-sized pieces (about 3 cups)
- 2 large eggs
- 1 tablespoon vegetable oil, divided
- ½ cup frozen peas and carrots, thawed
- 3 stalks green onion, sliced
- 2 cloves garlic, minced
- 1 tablespoon low-sodium soy sauce
- 1 teaspoon sesame oil
- ½ teaspoon ginger powder
- Salt and pepper to taste
- Optional: diced tofu, cooked shrimp, or diced chicken for extra protein
Instructions
Prepare the cauliflower rice first. Remove the leaves and stem from the cauliflower head and cut it into large florets. Working in batches, pulse the florets in a food processor until they break down into small, rice-sized granules — about 6 to 8 pulses. Avoid over-processing into a paste. You can also grate the cauliflower on the large holes of a box grater if you do not have a food processor. Spread the cauliflower rice on a paper towel and press firmly to absorb as much moisture as possible. Removing moisture is critical — excess water causes the cauliflower to steam and clump in the pan instead of frying and getting slightly golden.
Crack the eggs into a small bowl and beat lightly with a fork. Season with a pinch of salt.
Heat half the vegetable oil in a large skillet or wok over medium-high heat. Pour in the beaten eggs. Scramble them gently until just set — remove them while they still look slightly underdone as they will finish cooking when returned to the pan later. Set the eggs aside.
Add the remaining vegetable oil to the hot pan. Increase heat to high. Add the garlic and stir for 30 seconds. Add the cauliflower rice and spread it out in an even layer. Press it down and let it cook without stirring for two to three minutes so the bottom layer can get a little golden. Then toss and stir for another two to three minutes until the cauliflower is cooked through and slightly golden overall.
Add the thawed peas and carrots and stir into the cauliflower. Cook for two minutes. Push everything to the sides of the pan and drizzle soy sauce and sesame oil into the center. Let it sizzle for a few seconds, then toss everything together. Add the ginger powder and stir to combine.
Return the scrambled eggs to the pan and fold them into the fried rice mixture, breaking any large pieces apart. Toss everything together over high heat for one final minute.
Serve immediately, topped with sliced green onions and optional protein additions.
22. Sheet Pan Salmon and Vegetables
Prep Time: 15 minutes | Cook Time: 25 minutes | Serves: 2
Two salmon fillets and a colorful assortment of vegetables all roasted on a single sheet pan with a simple garlic herb oil. Minimal cleanup, maximum flavor — one of the easiest and most reliable healthy dinner recipes for two in this entire collection.
Ingredients
- 2 salmon fillets (5–6 oz each)
- 1 cup cherry tomatoes
- 1 medium zucchini, sliced into half-moons
- 1 cup asparagus, ends trimmed
- ½ red onion, sliced into wedges
- 3 tablespoons olive oil, divided
- 3 cloves garlic, minced
- 1 teaspoon dried Italian seasoning
- ½ teaspoon smoked paprika
- Zest of 1 lemon
- Salt and black pepper to taste
- Lemon wedges for serving
- Fresh dill or parsley for garnish
Instructions
Preheat the oven to 425°F (220°C). Line a large sheet pan with parchment paper. A hot oven is important for this recipe — salmon and vegetables both need high heat to roast properly and develop flavor rather than just cooking through without any color.
Prepare the vegetables. Slice the zucchini into half-moon shapes about half an inch thick. Trim the woody ends off the asparagus by bending each spear gently near the bottom until it snaps — the spear naturally breaks at the point where it becomes tender. Cut the red onion into small wedges so the layers hold together during roasting.
In a large bowl, combine the zucchini, asparagus, cherry tomatoes, and red onion. Drizzle with two tablespoons of olive oil, half the minced garlic, Italian seasoning, smoked paprika, salt, and black pepper. Toss everything well until every piece is coated. Spread the vegetables in an even single layer on the prepared sheet pan, leaving some space in the center or at one end for the salmon.
Bake the vegetables alone for ten minutes first. This gives them a head start since salmon cooks faster than root vegetables and denser vegetables.
While the vegetables pre-roast, prepare the salmon. Pat the fillets dry on both sides. Combine the remaining tablespoon of olive oil with the remaining garlic and lemon zest in a small bowl. Brush or spoon this mixture over the top of both fillets and season with salt and black pepper.
After ten minutes, remove the sheet pan from the oven. Give the vegetables a quick stir and push them to the sides or arrange them around the edges. Place the seasoned salmon fillets skin-side down in the space you created. Return the pan to the oven.
Roast everything together for 12 to 15 more minutes until the salmon is cooked through and flakes easily when pressed with a fork. The vegetables should be tender and slightly caramelized at the edges. The cherry tomatoes will have softened and started to burst, releasing their juices across the pan — that liquid is delicious spooned over the salmon.
Remove the pan and let everything rest for two minutes. Slide the salmon and vegetables onto plates. Squeeze fresh lemon over everything and garnish with fresh dill or parsley.
How to Customize These Recipes for Dietary Needs
Making small changes to a recipe can fit almost any eating style. These healthy dinner recipes for two are very easy to adjust.
1. Gluten-free options: Most of these recipes are already naturally gluten-free or very close to it. For any recipe that uses soy sauce, swap it for tamari or coconut aminos, which are both gluten-free. Replace regular pasta with certified gluten-free pasta made from rice, lentil, or chickpea flour. Always check that any canned sauces or condiments you use are labeled gluten-free.
2. Low-carb modifications: Many recipes here can shift to lower-carb versions with a simple swap. Replace rice and pasta with cauliflower rice, spiralized vegetables, or extra roasted vegetables. Skip the tortillas in the wraps and use large lettuce leaves instead. The grain bowls can be made without the grains and still satisfy as a protein-and-vegetable plate.
3. Vegetarian swaps: Any chicken or beef recipe can become vegetarian by replacing the meat with firm tofu, tempeh, canned white beans, lentils, or a large portobello mushroom. These substitutes absorb marinades and spices in the same way meat does, so the seasonings and cooking methods stay the same. The chickpea and lentil recipes are already fully plant-based and require no changes at all.
4. Dairy-free adjustments: Replace cheese with nutritional yeast for a savory, cheesy flavor without the dairy. Use coconut yogurt in place of Greek yogurt in dressings and sauces. The majority of recipes in this collection are already dairy-free or use dairy only as a garnish that is easy to leave out.
Conclusion
Eating healthy as a couple does not have to be hard or boring. These twenty-two healthy dinner recipes for two are here to show that real food — whole ingredients, balanced nutrition, and true flavor — is completely achievable on any night of the week.
Starting out, you might make one or two of these recipes and feel a difference almost right away: more energy, lighter digestion, and the satisfaction of knowing exactly what went into your meal.
The key to making healthy eating stick is consistency, not perfection. You do not need to make every dinner a masterpiece. Cook a simple sheet pan meal one night and a five-ingredient salad bowl the next.
Mix and match from this collection based on what is in your fridge, what you are craving, and how much time you have. Over time, these meals stop feeling like “healthy eating” and start feeling like just the way you eat — naturally, together, and well.
Keep exploring different flavors and ingredients, and do not be afraid to adjust any recipe to match your taste. These are starting points, not rigid rules.
The more you cook together, the more confident and comfortable the process becomes. Two people, one kitchen, and a little bit of effort each evening is all it takes to build a genuinely healthy life, one dinner at a time.