
Cooking at home has never been easier or more enjoyable, thanks to the Bella air fryer. Bella air fryers have become one of the most popular kitchen tools in the United States because they make cooking fast, clean, and simple for anyone.
Whether you are a first-time cook or someone who has been in the kitchen for years, a Bella air fryer gives you amazing results every single time.
Bella air fryers use hot air circulation technology to cook food evenly on all sides, which means you get that golden, crispy texture without needing cups of oil.
That is one big reason why Bella air fryer recipes are so much healthier compared to traditional deep frying. You use little to no oil, so your meals have fewer calories and less fat.
On top of that, cleanup is quick because there is no greasy mess to deal with. These Bella air fryer recipes you are about to explore cover everything from breakfast to dinner to dessert, so there is always something new to try.

Why Choose a Bella Air Fryer for Everyday Cooking?
A Bella air fryer is not just another kitchen gadget sitting on your counter. It is a reliable cooking tool that makes daily meal prep easier, faster, and healthier. Here is why so many home cooks reach for their Bella air fryer every single day:
1. Fast Cooking Times — A Bella air fryer cooks food much faster than a regular oven. Most meals are ready in 15 to 25 minutes, which means you spend less time waiting and more time eating. The hot air circulation heats up quickly, so there is no long preheating period needed.
2. Energy-Efficient Appliance — Because the Bella air fryer cooks food in a shorter time and uses a compact cooking space, it uses far less electricity than a full-sized oven. This is great news for your monthly energy bill and also better for the environment.
3. Easy-to-Use Controls — Bella air fryers are designed with simple, straightforward controls that anyone can learn in minutes. You just set the temperature, set the timer, and let the machine do the work. There is no complicated setup or confusing settings to figure out.
4. Perfect for Beginners and Experienced Cooks — You do not need any special cooking skills to get great results from a Bella air fryer. Beginners can follow simple recipes and get crispy, delicious food right away. At the same time, more experienced cooks can use the Bella air fryer to experiment with new techniques and flavor combinations.
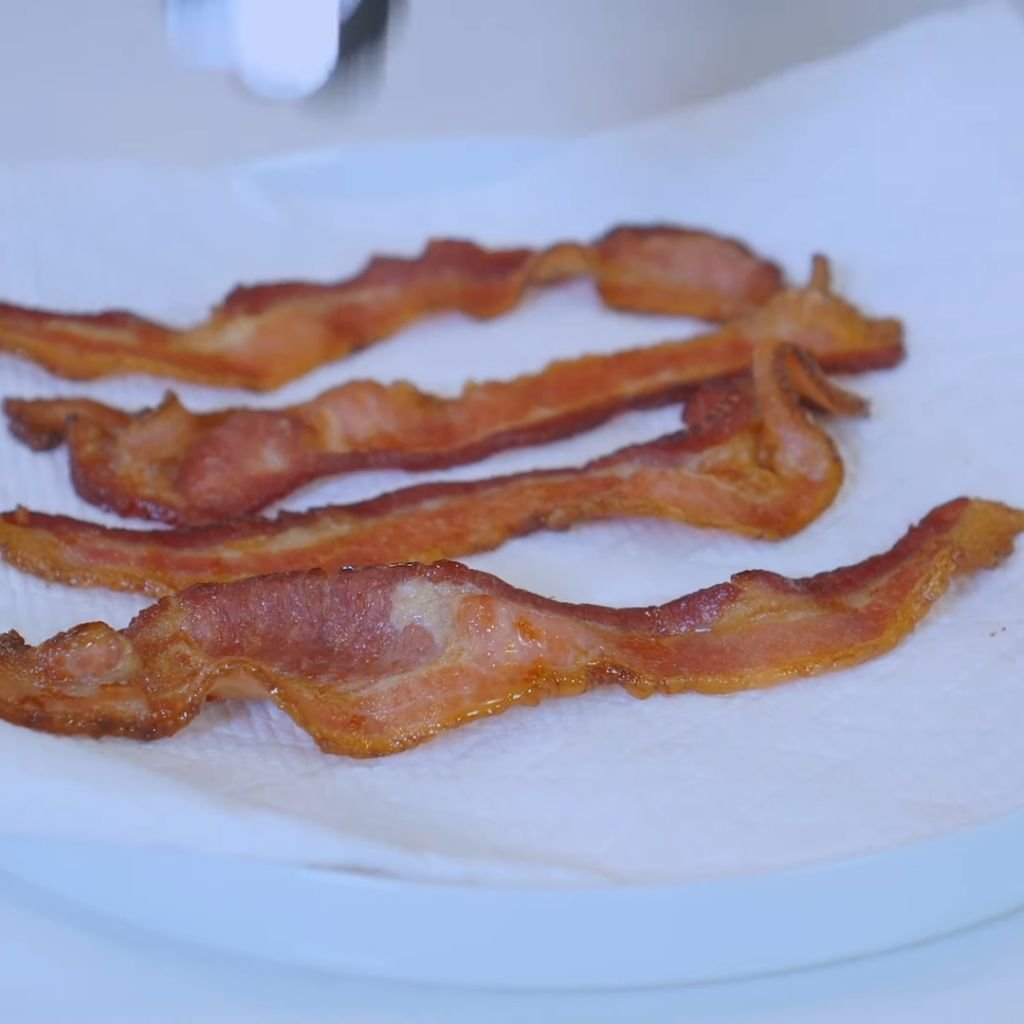
1. Air Fryer Bacon
Prep Time: 2 minutes | Cook Time: 8–10 minutes | Serve: 2–4 servings
Crispy, perfectly cooked bacon has never been this easy. Making bacon in your Bella air fryer skips the stovetop splatter entirely and gives you evenly cooked strips every time. The excess grease drips away from the food during cooking, making each strip a little lighter than pan-fried versions.
Ingredients:
- 6–8 strips of thick-cut or regular bacon
- Optional: black pepper or brown sugar for seasoning
Instructions:
Start by taking your bacon strips out of the package and laying them flat on a clean surface. If the strips are very long, you can cut them in half so they fit more easily inside the air fryer basket without overlapping too much. Overlapping bacon will not cook evenly, so try to keep the strips as flat and separated as possible.
Open your Bella air fryer and place the bacon strips in a single layer inside the basket. Depending on the size of your fryer, you may need to work in batches. Do not stack the strips on top of each other. If you have leftover strips, cook the first batch and then move on to the second once the first is done.
Close the air fryer and set the temperature to 350°F (175°C). Set the timer for 8 to 10 minutes. Thinner bacon will be done closer to 8 minutes, while thick-cut bacon may need the full 10 minutes or a little more. At the halfway point, which is around the 4 or 5-minute mark, open the basket carefully and use tongs to flip each strip. This helps both sides cook evenly and get that uniform golden color.
Keep a close eye on the bacon in the last 2 minutes because it can go from perfectly crispy to overdone quickly. Once the bacon reaches your desired level of crispiness, carefully remove the basket from the Bella air fryer using oven mitts or the built-in handle, since both the basket and the rendered bacon grease inside can be very hot.
Use tongs to lift the cooked bacon strips out of the basket and place them on a plate lined with paper towels. Let them rest for about 1 minute. The paper towels will soak up any remaining grease and the bacon will crisp up just a little more as it cools. If you like your bacon with a slightly sweet and smoky taste, sprinkle a tiny bit of brown sugar on each strip before cooking. For a spicier kick, add a pinch of cracked black pepper before you start. Serve right away with eggs, toast, or use it in sandwiches and salads.
2. Air Fryer Breakfast Potatoes
Prep Time: 10 minutes | Cook Time: 18–22 minutes | Serve: 4 servings
Golden, crispy breakfast potatoes made right in your Bella air fryer are the perfect way to start the morning. Seasoned with simple pantry spices and cooked to perfection, these potatoes have a crunchy outside and a soft, fluffy inside that pairs beautifully with eggs or bacon.
Ingredients:
- 3 medium russet or Yukon Gold potatoes, diced into ½-inch cubes
- 2 tablespoons olive oil
- 1 teaspoon garlic powder
- 1 teaspoon onion powder
- 1 teaspoon smoked paprika
- ½ teaspoon salt
- ¼ teaspoon black pepper
- Optional: ¼ cup diced bell pepper and onion
Instructions:
Begin by washing and scrubbing your potatoes thoroughly under cold running water. You can peel them if you prefer, but leaving the skin on adds extra texture and nutrients. After washing, dry them well with a kitchen towel or paper towels. Wet potatoes will steam instead of crisp up, so making sure they are completely dry before seasoning is very important.
Dice the potatoes into small, even cubes about half an inch in size. Keeping the pieces similar in size means they will all cook at the same rate. Transfer the diced potatoes to a large mixing bowl.
Add the olive oil to the bowl and toss the potatoes until every piece is lightly coated. Then sprinkle in the garlic powder, onion powder, smoked paprika, salt, and black pepper. Toss everything again until the seasonings are evenly distributed. If you are adding bell pepper or onion, toss those in at this stage too.
Preheat your Bella air fryer to 400°F (200°C) for about 3 minutes. Once heated, open the basket and spread the seasoned potatoes in a single, even layer. Avoid piling them up because stacked potatoes will not get crispy on all sides. If your fryer is small, cook the potatoes in two batches.
Cook at 400°F for 18 to 22 minutes total. At the 10-minute mark, open the basket and shake it gently or use a spatula to stir the potatoes so all sides get exposed to the hot circulating air. Continue cooking for the remaining time. In the last few minutes, check on them every couple of minutes until they are as crispy and golden as you like. Remove from the basket and serve hot as a side dish or breakfast bowl base.
3. Air Fryer French Toast Sticks
Prep Time: 8 minutes | Cook Time: 10 minutes | Serve: 4 servings
Kids and adults both go crazy for these golden, lightly crunchy French toast sticks cooked in the Bella air fryer. Made with thick bread, a rich egg mixture, and a dusting of cinnamon sugar, they come out warm and satisfying every morning without heating up the whole kitchen.
Ingredients:
- 4 thick slices of Texas toast or brioche bread
- 2 large eggs
- 3 tablespoons whole milk
- 1 teaspoon vanilla extract
- 1 teaspoon cinnamon
- 2 tablespoons sugar
- Pinch of salt
- Cooking spray
- Maple syrup or powdered sugar for serving
Instructions:
Start by cutting each slice of bread into three equal strips so you end up with 12 sticks total. Thicker bread like Texas toast or brioche works best because it holds the egg mixture without falling apart and gives you a softer interior once cooked.
In a medium shallow bowl, crack the two eggs and whisk them well. Add the milk, vanilla extract, cinnamon, and a pinch of salt. Whisk everything together until the mixture is smooth and fully combined. In a separate small bowl, mix together the sugar and cinnamon and set it aside for topping later.
Preheat your Bella air fryer to 370°F (188°C) for 3 minutes. While it heats up, lightly spray the air fryer basket with cooking spray to prevent sticking.
One at a time, dip each bread stick into the egg mixture, making sure all sides are coated. Let the excess drip off for a second or two before placing the stick into the basket. Lay the sticks in a single layer without touching each other. Depending on the size of your fryer, you may need to cook them in two rounds.
Cook at 370°F for 5 minutes, then open the basket and carefully flip each stick using tongs. Spray lightly with cooking spray on the uncooked side. Cook for another 4 to 5 minutes until the sticks are golden and slightly firm on the outside. Remove from the basket and immediately dust with the cinnamon sugar mixture while they are still warm. Serve with maple syrup, fruit jam, or a sprinkle of powdered sugar on top.
4. Air Fryer Egg Muffins
Prep Time: 10 minutes | Cook Time: 12–15 minutes | Serve: 6 muffins
Packed with protein and easy to customize, these air fryer egg muffins are a great grab-and-go breakfast option. Made with eggs, cheese, and your favorite mix-ins, they cook up light and fluffy in the Bella air fryer in under 15 minutes. Great for meal prep during the week.
Ingredients:
- 6 large eggs
- ¼ cup shredded cheddar cheese
- ¼ cup diced bell peppers
- ¼ cup diced cooked turkey sausage or ham
- 2 tablespoons milk
- Salt and pepper to taste
- Cooking spray
- Silicone muffin cups (6 pieces)
Instructions:
Crack all six eggs into a large mixing bowl and add the milk, salt, and pepper. Whisk everything together vigorously until the yolks and whites are fully blended and the mixture looks slightly frothy. This helps create a lighter, airier texture in the finished muffins.
Add your diced bell peppers, cooked sausage or ham, and shredded cheese to the egg mixture. Stir gently to combine. Feel free to swap in any vegetables or proteins you enjoy — mushrooms, spinach, onions, and bacon are all great options.
Lightly spray the inside of each silicone muffin cup with cooking spray. Silicone cups are ideal for the air fryer because they are flexible, non-stick, and can handle the heat without any issues. Fill each cup about three-quarters of the way full with the egg mixture, leaving room for the eggs to puff up as they cook.
Preheat your Bella air fryer to 300°F (150°C). Carefully place the filled silicone cups into the air fryer basket. Make sure they are level and not tilted so the egg mixture stays inside the cups as it cooks.
Cook at 300°F for 12 to 15 minutes. The egg muffins are done when the tops look set and do not jiggle when you gently shake the basket. A toothpick inserted into the center should come out clean. Let the muffins cool for 2 to 3 minutes before removing them from the silicone cups. They pop out easily once cooled. Serve warm or store in the fridge for up to 4 days. Reheat in the air fryer at 300°F for 2 to 3 minutes when ready to eat.
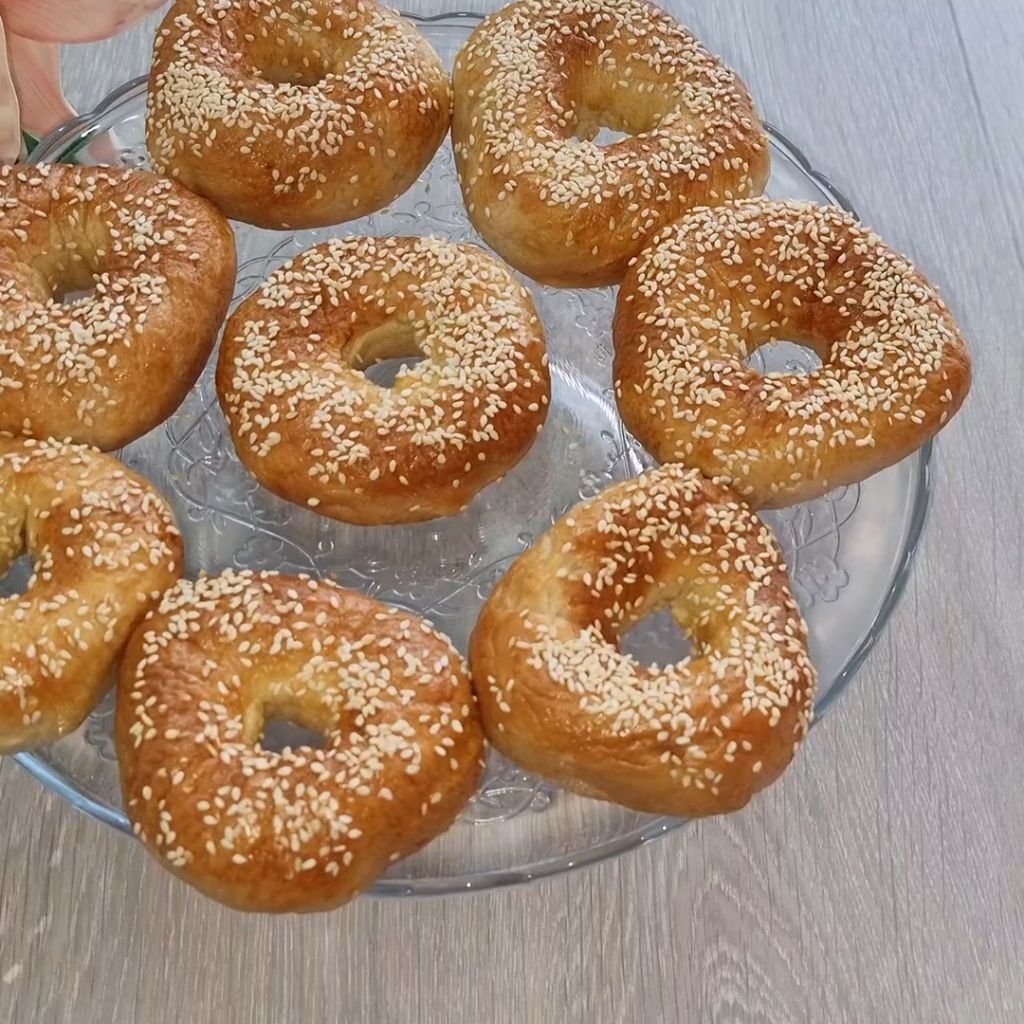
5. Air Fryer Bagels
Prep Time: 5 minutes | Cook Time: 12–14 minutes | Serve: 4 bagels
Homemade bagels from your Bella air fryer are chewy, golden, and ready in no time. Made with just a few simple ingredients including self-rising flour and Greek yogurt, these bagels skip the boiling step entirely and still come out with that satisfying chew and beautiful crust.
Ingredients:
- 1 cup self-rising flour
- 1 cup plain Greek yogurt (full-fat works best)
- 1 egg, beaten (for egg wash)
- Everything bagel seasoning or sesame seeds for topping
- Cooking spray
Instructions:
In a large mixing bowl, combine the self-rising flour and Greek yogurt. Use a wooden spoon or your hands to mix them together until a dough starts to form. At first the mixture may look shaggy and uneven, but keep mixing and pressing until it comes together into a smooth ball. If the dough feels too sticky, add a small spoonful of flour at a time until it is easy to handle.
Lightly flour a clean countertop or cutting board and transfer the dough onto the surface. Divide the dough into 4 equal portions. Roll each portion into a rope shape about 7 or 8 inches long, then bring the ends together and pinch them firmly to form a ring. Make sure the pinched joint is sealed tightly so it does not open up during cooking.
Preheat your Bella air fryer to 350°F (175°C). While it heats up, lightly spray the basket with cooking spray so the bagels do not stick. Place the shaped bagels into the basket with some space between them.
Brush the top and sides of each bagel with the beaten egg wash using a pastry brush or the back of a spoon. The egg wash helps the bagels get that deep golden-brown color and also helps the toppings stick. Sprinkle everything bagel seasoning, sesame seeds, or any topping you like generously over the top.
Cook at 350°F for 12 to 14 minutes. At the halfway mark, check the bagels. They should be puffed and starting to brown. You do not need to flip them. Continue cooking until the tops are deeply golden and the outside feels firm when tapped. Remove from the basket and let them cool on a wire rack for 5 minutes before slicing. Serve with cream cheese, butter, or your favorite spreads.
6. Air Fryer Mozzarella Sticks
Prep Time: 15 minutes + 30 min freeze | Cook Time: 8 minutes | Serve: 4 servings
Gooey melted cheese wrapped in a crispy golden coating — these air fryer mozzarella sticks are the perfect snack or party appetizer. Made in your Bella air fryer, they get beautifully crispy without any deep frying and the cheese stays perfectly melted inside every single time.
Ingredients:
- 8 mozzarella string cheese sticks
- 1 cup Italian breadcrumbs
- 2 large eggs, beaten
- ½ cup all-purpose flour
- 1 teaspoon garlic powder
- 1 teaspoon dried Italian seasoning
- Cooking spray
- Marinara sauce for dipping
Instructions:
Unwrap all the mozzarella string cheese sticks and lay them on a baking sheet lined with parchment paper. Place the baking sheet in the freezer and let the cheese sticks freeze for at least 30 minutes. This step is very important — freezing the cheese before cooking prevents it from melting out through the breading before the coating has time to crisp up properly.
Set up a breading station with three separate shallow bowls. In the first bowl, place the flour. In the second bowl, add the beaten eggs. In the third bowl, combine the breadcrumbs, garlic powder, and Italian seasoning and mix them together.
Take the frozen cheese sticks out of the freezer. Working one at a time, roll each stick first in the flour and shake off any excess. Then dip it into the egg, making sure it is fully coated. Finally, roll it in the seasoned breadcrumb mixture and press gently so the coating sticks well. For an extra thick, crunchier coating, dip the stick back into the egg and roll in breadcrumbs a second time.
Place the coated sticks back onto the parchment-lined baking sheet and freeze for another 15 minutes. This second freeze helps lock the breading in place.
Preheat your Bella air fryer to 390°F (199°C). Spray the basket with cooking spray and place the mozzarella sticks inside in a single layer with some space between them. Spray the tops lightly with cooking spray as well.
Cook at 390°F for 6 to 8 minutes until the coating is golden and crispy. Watch closely in the last minute or two because the cheese can start to leak out if they are left too long. Remove carefully and serve immediately with warm marinara sauce for dipping.
7. Air Fryer Jalapeño Poppers
Prep Time: 15 minutes | Cook Time: 10 minutes | Serve: 6 servings
Spicy, creamy, and impossibly crispy — these jalapeño poppers from your Bella air fryer are always a crowd pleaser. The combination of softened pepper, rich cream cheese filling, and a golden crisp coating makes every bite completely satisfying. Perfect for game day, parties, or a quick spicy snack.
Ingredients:
- 12 fresh jalapeño peppers
- 8 oz cream cheese, softened
- 1 cup shredded cheddar cheese
- ½ teaspoon garlic powder
- ½ teaspoon onion powder
- ½ cup breadcrumbs
- 2 eggs, beaten
- Cooking spray
Instructions:
Put on food-safe gloves before handling the jalapeños because the oils from the peppers can irritate your skin and eyes. Wash the jalapeños under cold water and dry them with a paper towel. Using a sharp knife, slice each jalapeño in half lengthwise. Use a small spoon or your gloved finger to scoop out the seeds and the white membranes from the inside of each pepper half. Removing the seeds reduces the heat level. If you love extra spice, leave some seeds in.
In a mixing bowl, combine the softened cream cheese, shredded cheddar, garlic powder, and onion powder. Stir well until everything is smooth and evenly mixed. Use a small spoon to generously fill each jalapeño half with the cheese mixture, mounding it slightly above the rim of the pepper.
Set up two bowls — one with beaten eggs and one with breadcrumbs. Dip the filled side of each popper into the egg first, then press it gently into the breadcrumbs so the topping sticks to the cheese. You can also sprinkle the breadcrumbs on top rather than dipping if you prefer.
Preheat your Bella air fryer to 375°F (190°C). Spray the basket with cooking spray and arrange the poppers filling-side up in a single layer. Make sure they are stable and not leaning to the side. Spray the tops lightly with cooking spray to help the crumbs brown evenly.
Cook at 375°F for 8 to 10 minutes until the peppers are tender, the cheese is bubbly, and the breadcrumb topping is golden and crisp. Let them rest for 2 minutes before serving since the filling will be very hot. Serve with ranch dressing or sour cream on the side.
8. Air Fryer Garlic Parmesan Wings
Prep Time: 10 minutes | Cook Time: 22–25 minutes | Serve: 4 servings
Crispy, juicy chicken wings coated in a buttery garlic parmesan sauce are hard to beat. These Bella air fryer garlic parmesan wings come out with an incredibly crunchy skin and tender meat without a drop of oil for frying. A go-to recipe for game nights and easy dinners.
Ingredients:
- 2 pounds chicken wings, tips removed, split into flats and drumettes
- 1 teaspoon baking powder
- 1 teaspoon garlic powder
- ½ teaspoon salt
- ½ teaspoon black pepper
- 3 tablespoons unsalted butter, melted
- 4 cloves garlic, minced
- ½ cup grated Parmesan cheese
- 2 tablespoons fresh parsley, chopped
Instructions:
Pat the chicken wings completely dry using paper towels. Getting all the moisture off the surface of the skin is the single most important step for achieving truly crispy wings in the air fryer. Even a little extra moisture will cause the skin to steam rather than crisp.
In a large bowl, toss the dried wings with baking powder, garlic powder, salt, and black pepper. Make sure every wing is coated evenly. The baking powder draws moisture out of the skin as it cooks, which is another key trick for maximum crispiness.
Preheat your Bella air fryer to 380°F (193°C). Place the wings in the basket in a single layer. Do not overcrowd the basket — cook in two batches if needed. Cook at 380°F for 20 minutes, flipping the wings at the 10-minute mark. After 20 minutes, increase the temperature to 400°F (200°C) and cook for an additional 4 to 5 minutes to really crisp up the skin.
While the wings finish cooking, make the garlic parmesan sauce. In a small saucepan over medium-low heat, melt the butter and add the minced garlic. Cook the garlic for 1 to 2 minutes, stirring constantly, until it is fragrant but not browned. Remove from heat and stir in the grated Parmesan.
Transfer the cooked wings to a large bowl. Pour the garlic parmesan butter over the wings and toss to coat every piece thoroughly. Sprinkle with fresh parsley and serve immediately while hot. These wings are delicious on their own or served with celery sticks and blue cheese or ranch dressing on the side.
9. Air Fryer Onion Rings
Prep Time: 15 minutes | Cook Time: 12 minutes | Serve: 4 servings
Golden, crunchy onion rings with a tender, sweet center are achievable right at home in your Bella air fryer. The seasoned breadcrumb coating gets perfectly crisp without any deep frying, and the result is a lighter version of the classic that does not compromise on flavor or crunch.
Ingredients:
- 2 large yellow onions
- 1 cup all-purpose flour
- 2 large eggs, beaten
- 1½ cups panko breadcrumbs
- 1 teaspoon paprika
- 1 teaspoon garlic powder
- ½ teaspoon salt
- ¼ teaspoon cayenne pepper (optional)
- Cooking spray
Instructions:
Peel the onions and slice them into rings about ¾ of an inch thick. Separate all the rings from each other and set them on a clean surface. Thicker rings hold up better during the breading process and provide a nice, meaty bite.
Set up a three-bowl breading station. Place flour in the first bowl. Add the beaten eggs to the second bowl. In the third bowl, mix the panko breadcrumbs with paprika, garlic powder, salt, and cayenne pepper if using. Panko breadcrumbs create a much crunchier coating compared to regular breadcrumbs, so use them if you can find them.
Working one ring at a time, dip each onion ring into the flour first, then shake off the excess. Move it to the egg bowl and coat completely. Finally, press it into the panko mixture firmly so the crumbs adhere to all sides. Place the coated rings on a baking sheet or plate while you finish the rest.
Preheat your Bella air fryer to 375°F (190°C). Spray the basket with cooking spray and arrange the onion rings in a single layer inside. Do not stack them. Cook in batches if needed. Spray the tops of the rings lightly with cooking spray.
Cook at 375°F for 10 to 12 minutes, flipping the rings carefully at the halfway point using tongs. The rings are ready when the coating is deep golden brown and fully crisp. Remove from the air fryer and season with a little extra salt right away while they are still hot. Serve with ketchup, ranch dressing, or your favorite dipping sauce.
10. Air Fryer Stuffed Mushrooms
Prep Time: 15 minutes | Cook Time: 10 minutes | Serve: 4 servings
Juicy mushroom caps filled with a savory cream cheese and herb stuffing make for an impressive appetizer that comes together in minutes. Cooked in the Bella air fryer, the mushrooms get perfectly tender while the filling turns golden and bubbling hot on top.

Ingredients:
- 16 large white or baby bella mushrooms
- 6 oz cream cheese, softened
- ¼ cup grated Parmesan cheese
- 2 cloves garlic, minced
- 2 tablespoons fresh parsley, chopped
- ¼ teaspoon salt
- ¼ teaspoon black pepper
- Cooking spray
Instructions:
Clean the mushrooms by gently wiping them with a damp paper towel. Do not rinse them under running water because mushrooms absorb water quickly and become soggy when wet. Remove the stems by twisting them gently until they pop free. Set the caps aside and finely chop the stems.
In a skillet over medium heat, add a small splash of oil or cooking spray. Sauté the chopped mushroom stems with the minced garlic for 3 to 4 minutes until softened and fragrant. Remove from heat and let them cool for a couple of minutes.
In a mixing bowl, combine the softened cream cheese, grated Parmesan, sautéed stems and garlic, fresh parsley, salt, and pepper. Mix everything until well combined and smooth. The filling should be thick and hold its shape when scooped.
Use a small spoon to generously fill each mushroom cap with the cream cheese mixture. Mound the filling slightly so each cap is well packed. Place the filled caps into your Bella air fryer basket, filling side up, in a single layer.
Cook at 360°F (182°C) for 8 to 10 minutes until the mushrooms are tender and the filling is lightly golden and bubbly on top. Let them rest for 2 minutes before serving since the filling retains heat. Arrange on a serving platter and garnish with a little extra chopped parsley.
11. Air Fryer Chicken Breast
Prep Time: 10 minutes | Cook Time: 18–22 minutes | Serve: 2–4 servings
Perfectly juicy and tender chicken breast cooked in the Bella air fryer turns out moist on the inside and golden on the outside every single time. With a simple seasoning blend and proper cook time, this becomes your go-to weeknight protein that pairs with almost any side dish you can think of.
Ingredients:
- 2 boneless, skinless chicken breasts (6–8 oz each)
- 1 tablespoon olive oil
- 1 teaspoon garlic powder
- 1 teaspoon onion powder
- 1 teaspoon paprika
- ½ teaspoon dried oregano
- ½ teaspoon salt
- ¼ teaspoon black pepper
Instructions:
Take the chicken breasts out of the refrigerator about 15 minutes before cooking so they can come closer to room temperature. This helps the chicken cook more evenly from edge to center. Place the chicken on a cutting board and pat them completely dry with paper towels.
If the chicken breasts are very thick — more than an inch — use a sharp knife to carefully slice them in half horizontally to create two thinner pieces. Alternatively, place the breast in a zip-lock bag and use a meat mallet or rolling pin to pound them to an even thickness of about ¾ of an inch. Even thickness means even cooking, so no parts are dried out while other parts are still undercooked.
In a small bowl, combine the garlic powder, onion powder, paprika, dried oregano, salt, and pepper and stir to mix. Drizzle the olive oil over the chicken and rub it all over both sides. Then sprinkle the seasoning mixture evenly over both sides of each piece and press gently with your fingertips so the seasoning adheres well.
Preheat your Bella air fryer to 375°F (190°C) for about 3 minutes. Place the seasoned chicken breasts in the basket in a single layer. Make sure they are not overlapping each other. Cook at 375°F for 9 minutes, then open the basket and flip the chicken over using tongs. Continue cooking for another 9 to 12 minutes. The internal temperature of fully cooked chicken should reach 165°F (74°C) measured at the thickest part using a meat thermometer.
Once the chicken reaches the correct temperature, remove it from the basket and place it on a cutting board or plate. Tent it loosely with aluminum foil and let it rest for at least 5 minutes before cutting. Resting allows the juices to redistribute throughout the meat, making every bite tender and moist rather than dry. Slice and serve with roasted vegetables, rice, salad, or any side of your choice.
12. Air Fryer Chicken Tenders
Prep Time: 15 minutes | Cook Time: 12–14 minutes | Serve: 4 servings
Homemade chicken tenders from the Bella air fryer are golden, crispy, and so much better than anything from a fast-food bag. A seasoned breadcrumb coating gives them a satisfying crunch while the meat inside stays tender and juicy. Great for kids and adults to enjoy alongside their favorite dipping sauce.
Ingredients:
- 1 pound chicken tenders (or chicken breasts cut into strips)
- 1 cup panko breadcrumbs
- ½ cup all-purpose flour
- 2 eggs, beaten
- 1 teaspoon garlic powder
- 1 teaspoon paprika
- ½ teaspoon onion powder
- ½ teaspoon salt
- ¼ teaspoon black pepper
- Cooking spray
Instructions:
If using chicken breasts instead of pre-cut tenders, slice them into strips that are about one inch wide and three to four inches long. Try to keep all the strips a similar size so they finish cooking at the same time. Pat all the chicken pieces dry with paper towels.
Set up a three-bowl coating station. In the first bowl, place the flour. In the second bowl, add the beaten eggs. In the third bowl, combine the panko breadcrumbs, garlic powder, paprika, onion powder, salt, and black pepper and mix them together thoroughly.
Coat each chicken strip one at a time. Start by dredging it through the flour, covering all sides and shaking off the excess. Then dip it into the beaten egg and let the extra drip off. Finally, press it firmly into the seasoned panko mixture on all sides. For an extra crunchy coating, press down firmly and make sure the breadcrumbs are really packed onto the surface.
Preheat your Bella air fryer to 400°F (200°C). Spray the basket generously with cooking spray. Arrange the coated chicken tenders inside the basket in a single layer, making sure they are not touching. Spray the tops generously with cooking spray — this is what makes the breading turn deeply golden.
Cook at 400°F for 6 minutes. Open the basket and carefully flip each tender using tongs. Spray the other side lightly with cooking spray. Continue cooking for 6 to 8 more minutes until the coating is deeply golden brown and the chicken is cooked through. The internal temperature should read 165°F (74°C). Serve hot with honey mustard, barbecue sauce, ranch dressing, or ketchup.
13. Air Fryer Chicken Thighs
Prep Time: 10 minutes | Cook Time: 22–25 minutes | Serve: 4 servings
Chicken thighs come out of the Bella air fryer with the most beautiful, crackly golden skin and incredibly juicy meat inside. More forgiving than chicken breasts when it comes to cook time, chicken thighs are a reliable option for a stress-free dinner that delivers rich, satisfying flavor every time.
Ingredients:
- 4 bone-in, skin-on chicken thighs
- 1 tablespoon olive oil
- 1 teaspoon garlic powder
- 1 teaspoon smoked paprika
- ½ teaspoon dried thyme
- ½ teaspoon salt
- ¼ teaspoon black pepper
Instructions:
Take the chicken thighs out of the refrigerator and pat each one very dry with paper towels, paying extra attention to the skin side. The drier the skin, the crispier it will get in the air fryer. Trim away any large, loose pieces of excess fat from the edges if desired, but keep most of the skin intact since it protects the meat and crisps up beautifully.
In a small bowl, mix together the garlic powder, smoked paprika, dried thyme, salt, and black pepper. Rub the olive oil all over each thigh on both sides, then sprinkle the seasoning mix generously over the chicken. Use your fingers to rub the seasoning into the meat and under the skin where possible. Getting the seasoning under the skin adds deeper flavor to the meat itself.
Preheat your Bella air fryer to 380°F (193°C). Place the chicken thighs skin-side down in the basket in a single layer. Cook at 380°F for 12 minutes. Open the basket and carefully flip the thighs so they are now skin-side up. Increase the temperature to 400°F (200°C) and continue cooking for another 10 to 13 minutes.
The skin should be deeply golden and very crispy by the end. Use a meat thermometer to check the internal temperature — it should read at least 165°F (74°C), but chicken thighs are perfectly safe and even juicier at 175°F (79°C) because the extra heat breaks down the connective tissue. Remove from the basket and let rest for 5 minutes before serving. Great with mashed potatoes, steamed rice, or a simple green salad.
14. Air Fryer BBQ Chicken Drumsticks
Prep Time: 10 minutes | Cook Time: 25–28 minutes | Serve: 4 servings
Sticky, smoky, and full of flavor, these air fryer BBQ chicken drumsticks are everything you want in a weeknight dinner or backyard-style meal at home. The Bella air fryer gets the outside beautifully caramelized while keeping the meat inside tender and dripping with juicy barbecue goodness.
Ingredients:
- 8 chicken drumsticks
- 1 tablespoon olive oil
- 1 teaspoon garlic powder
- 1 teaspoon smoked paprika
- ½ teaspoon salt
- ¼ teaspoon black pepper
- ¾ cup your favorite barbecue sauce
Instructions:
Pat the drumsticks dry with paper towels and place them in a large bowl. Drizzle with olive oil and toss to coat. Season with garlic powder, smoked paprika, salt, and black pepper and toss again until every drumstick is evenly coated in oil and spices.
Preheat your Bella air fryer to 380°F (193°C). Arrange the drumsticks in the basket in a single layer. Depending on the size of your air fryer, you may need to cook them in two batches. Cook at 380°F for 10 minutes. Open the basket and turn each drumstick using tongs. Cook for another 10 minutes.
After the second 10 minutes, the drumsticks should be mostly cooked through. Open the basket and brush the drumsticks generously with barbecue sauce on all sides. Cook for another 5 to 8 minutes at 380°F, flipping once in the middle and applying more sauce. The sauce will caramelize and get slightly sticky and charred at the edges, which adds a wonderful depth of flavor.
Use a meat thermometer to confirm the internal temperature has reached 165°F (74°C) at the thickest part of the meat, avoiding the bone. Remove from the air fryer and brush with one more layer of fresh barbecue sauce for a bright, glossy finish. Let the drumsticks rest for 3 minutes before serving. Set out extra sauce on the side for dipping.
15. Air Fryer Chicken Parmesan
Prep Time: 15 minutes | Cook Time: 15–18 minutes | Serve: 4 servings
A beloved Italian-American classic made lighter and easier in the Bella air fryer. Crispy breaded chicken topped with marinara sauce and melted mozzarella cheese makes a meal that looks and tastes like it came from a restaurant, but is ready in about 30 minutes in your own kitchen.

Ingredients:
- 2 large boneless, skinless chicken breasts, halved horizontally
- 1 cup Italian breadcrumbs
- ¼ cup grated Parmesan cheese
- 2 eggs, beaten
- ½ cup all-purpose flour
- 1 teaspoon garlic powder
- ½ teaspoon salt
- Cooking spray
- ½ cup marinara sauce
- 1 cup shredded mozzarella cheese
- Fresh basil for garnish
Instructions:
Slice the chicken breasts in half horizontally to create four thinner cutlets. Place each cutlet between two sheets of plastic wrap and use a meat mallet to pound them to about ½-inch thickness. Even, thin cutlets cook faster and more uniformly in the air fryer.
In a shallow bowl, mix the breadcrumbs, grated Parmesan, garlic powder, and salt together. Set up a coating station with flour in one bowl, beaten eggs in another, and the breadcrumb mixture in the third. Coat each cutlet in flour first, then egg, then press firmly into the breadcrumb mixture on both sides.
Preheat your Bella air fryer to 400°F (200°C). Spray the basket with cooking spray and place the breaded cutlets inside. Spray the tops generously with cooking spray as well. Cook at 400°F for 8 minutes, then flip each cutlet carefully. Cook for another 5 minutes.
Open the basket and spoon about 2 tablespoons of marinara sauce evenly over the top of each cutlet. Then divide the shredded mozzarella cheese evenly over the sauce. Close the basket and cook for 2 to 3 more minutes until the cheese is fully melted and bubbling. Watch closely so it does not over-brown. Remove from the air fryer and garnish with fresh basil leaves before serving. Serve over pasta or alongside a crisp green salad.
16. Air Fryer Salmon
Prep Time: 5 minutes | Cook Time: 10–12 minutes | Serve: 2 servings
Flaky, tender salmon with a perfectly seasoned golden exterior comes together in just minutes using your Bella air fryer. With so little hands-on time needed and such reliable results, this salmon recipe is one you will come back to again and again for quick, nutritious dinners.
Ingredients:
- 2 salmon fillets (6 oz each, skin-on or skinless)
- 1 tablespoon olive oil
- 1 teaspoon garlic powder
- 1 teaspoon paprika
- ½ teaspoon dried dill or Italian seasoning
- ½ teaspoon salt
- ¼ teaspoon black pepper
- Lemon slices for serving
Instructions:
Remove the salmon fillets from the refrigerator about 10 minutes before cooking and pat them dry with paper towels. Removing surface moisture helps the seasoning stick better and allows the outside of the fish to develop a nice crust in the air fryer rather than steaming.
Brush or rub both sides of each fillet with olive oil. In a small bowl, mix together the garlic powder, paprika, dried dill or Italian seasoning, salt, and black pepper. Sprinkle the seasoning mixture evenly over the top and sides of each salmon fillet and press gently so it sticks.
Preheat your Bella air fryer to 400°F (200°C). Lightly spray the basket with cooking spray. Place the salmon fillets inside, skin-side down if the skin is on, with some space between them. Cook at 400°F for 10 to 12 minutes, depending on the thickness of the fillets. A fillet that is about 1 inch thick will be perfectly cooked at around 10 minutes. Thicker pieces may need the full 12 minutes or a minute or two more.
The salmon is done when it flakes easily when pressed gently with a fork in the thickest part, and the internal temperature reaches 125°F (52°C) for medium or 145°F (63°C) for fully cooked. Remove carefully from the basket since the fish can be delicate and may stick slightly if moved too aggressively. Serve on plates with fresh lemon slices squeezed over the top. Pairs beautifully with roasted vegetables, rice, or a light cucumber salad.
17. Air Fryer Shrimp
Prep Time: 10 minutes | Cook Time: 6–8 minutes | Serve: 4 servings
Plump, juicy shrimp seasoned with garlic and spices cooks up lightning fast in the Bella air fryer. With just a handful of ingredients and under 20 minutes start to finish, this shrimp recipe works great as a protein for tacos, pasta, salads, rice bowls, or just on its own with a simple dipping sauce.
Ingredients:
- 1 pound large shrimp, peeled and deveined (tails on or off)
- 1 tablespoon olive oil
- 1 teaspoon garlic powder
- 1 teaspoon paprika
- ½ teaspoon onion powder
- ½ teaspoon cumin (optional)
- ½ teaspoon salt
- ¼ teaspoon cayenne pepper (optional)
- Lemon wedges and fresh parsley for serving
Instructions:
Make sure the shrimp are thawed, peeled, and deveined before you begin. If using frozen shrimp, place them in a colander and run cold water over them for several minutes until fully thawed. Drain well and then pat the shrimp as dry as possible with paper towels. Excess moisture on shrimp leads to steaming instead of the light, quick sear you want from the air fryer.
Place the shrimp in a large bowl and drizzle with olive oil. Toss to coat all the shrimp lightly. Add the garlic powder, paprika, onion powder, cumin, salt, and cayenne pepper if using. Toss again until every piece of shrimp is evenly coated in the seasoning.
Preheat your Bella air fryer to 400°F (200°C). Place the shrimp in the basket in a single, even layer. Try not to overlap them — shrimp cook so fast that overlapping pieces will turn rubbery and uneven. Depending on how many shrimp you have, work in two batches if needed.
Cook at 400°F for 4 minutes, then open the basket and flip the shrimp or shake the basket gently. Cook for another 2 to 4 minutes. Shrimp cook very quickly, so keep a close eye on them. They are perfectly done when they turn pink and curl into a loose C shape. If they curl tightly into an O shape, they may be slightly overcooked — still edible but less juicy. Remove from the air fryer immediately and transfer to a serving dish. Squeeze fresh lemon over the top and sprinkle with parsley.
18. Air Fryer Fish Fillets
Prep Time: 10 minutes | Cook Time: 12–14 minutes | Serve: 4 servings
Light, flaky fish fillets with a golden, crispy breaded coating are a quick and easy dinner option in the Bella air fryer. Using white fish like cod, tilapia, or haddock, this recipe gives you pub-style crispy fish without any deep frying, heavy batter, or oily mess to clean up afterward.
Ingredients:
- 4 white fish fillets (cod, tilapia, or haddock, about 6 oz each)
- ½ cup all-purpose flour
- 2 eggs, beaten
- 1 cup panko breadcrumbs
- 1 teaspoon garlic powder
- 1 teaspoon paprika
- ½ teaspoon Old Bay seasoning
- ½ teaspoon salt
- Cooking spray
- Lemon wedges and tartar sauce for serving
Instructions:
Pat the fish fillets dry on all sides with paper towels. Fish naturally has quite a bit of moisture, so be thorough. If the fillets are very thick in some parts, you can slice them in half horizontally to create a more even thickness for consistent cooking throughout.
Set up your three-bowl breading station. In the first bowl, place the flour. In the second bowl, add the beaten eggs. In the third bowl, combine the panko breadcrumbs with garlic powder, paprika, Old Bay seasoning, and salt. Stir the breadcrumb mixture well so the spices are distributed throughout.
Pick up one fillet at a time and coat it first in the flour, pressing gently to help it stick. Shake off the excess flour. Dip the floured fillet into the beaten egg, letting the extra drip off. Finally, press it gently into the seasoned panko mixture on all sides, pressing down lightly so the coating sticks evenly. Set the coated fillet aside and repeat with the remaining fillets.
Preheat your Bella air fryer to 400°F (200°C). Spray the basket generously with cooking spray. Place the breaded fillets inside with space between them. Spray the tops of the fillets lightly with cooking spray. Cook at 400°F for 6 to 7 minutes, then open the basket and carefully flip each fillet using a wide spatula — fish is delicate and can break apart if handled too roughly. Spray the other side lightly. Cook for another 6 to 7 minutes until the coating is deep golden brown and the fish flakes easily. Serve with lemon wedges and tartar sauce.
19. Air Fryer Coconut Shrimp
Prep Time: 15 minutes | Cook Time: 8–10 minutes | Serve: 4 servings
Sweet, crunchy coconut-coated shrimp made in your Bella air fryer rival anything you would order at a tropical-themed restaurant. The coconut coating toasts up beautifully in the air fryer without a single drop of oil for frying, and the result is a sweet and savory shrimp that everyone at the table will love.
Ingredients:
- 1 pound large shrimp, peeled and deveined, tails on
- ½ cup all-purpose flour
- 2 eggs, beaten
- 1 cup sweetened shredded coconut
- ½ cup panko breadcrumbs
- ½ teaspoon salt
- ¼ teaspoon garlic powder
- Cooking spray
- Sweet chili sauce for dipping
Instructions:
Thaw the shrimp completely if frozen and pat them very dry with paper towels. Keeping the tails on gives each shrimp a convenient handle for dipping and also makes for a nicer presentation on the plate.
In a shallow bowl, mix the shredded coconut and panko breadcrumbs together. The panko adds structure and extra crunch to the coating that pure coconut alone cannot provide. In a separate bowl, place the flour seasoned with salt and garlic powder. Beat the eggs in a third bowl.
Hold each shrimp by the tail and dredge it through the flour first, covering all sides and shaking off the excess. Dip it next into the beaten egg. Finally, press it into the coconut-panko mixture firmly on all sides, making sure the coating covers the shrimp completely except for the tail. Place on a plate while you coat the remaining shrimp.
Preheat your Bella air fryer to 375°F (190°C). Spray the basket with cooking spray and arrange the shrimp in a single layer. Spray lightly over the tops with cooking spray. Cook at 375°F for 4 to 5 minutes, then open the basket and flip each shrimp carefully using tongs. Spray the other side with cooking spray. Cook for another 4 to 5 minutes until the coconut is golden and toasted. The shrimp should be pink and fully cooked. Remove and serve immediately with sweet chili sauce for dipping.
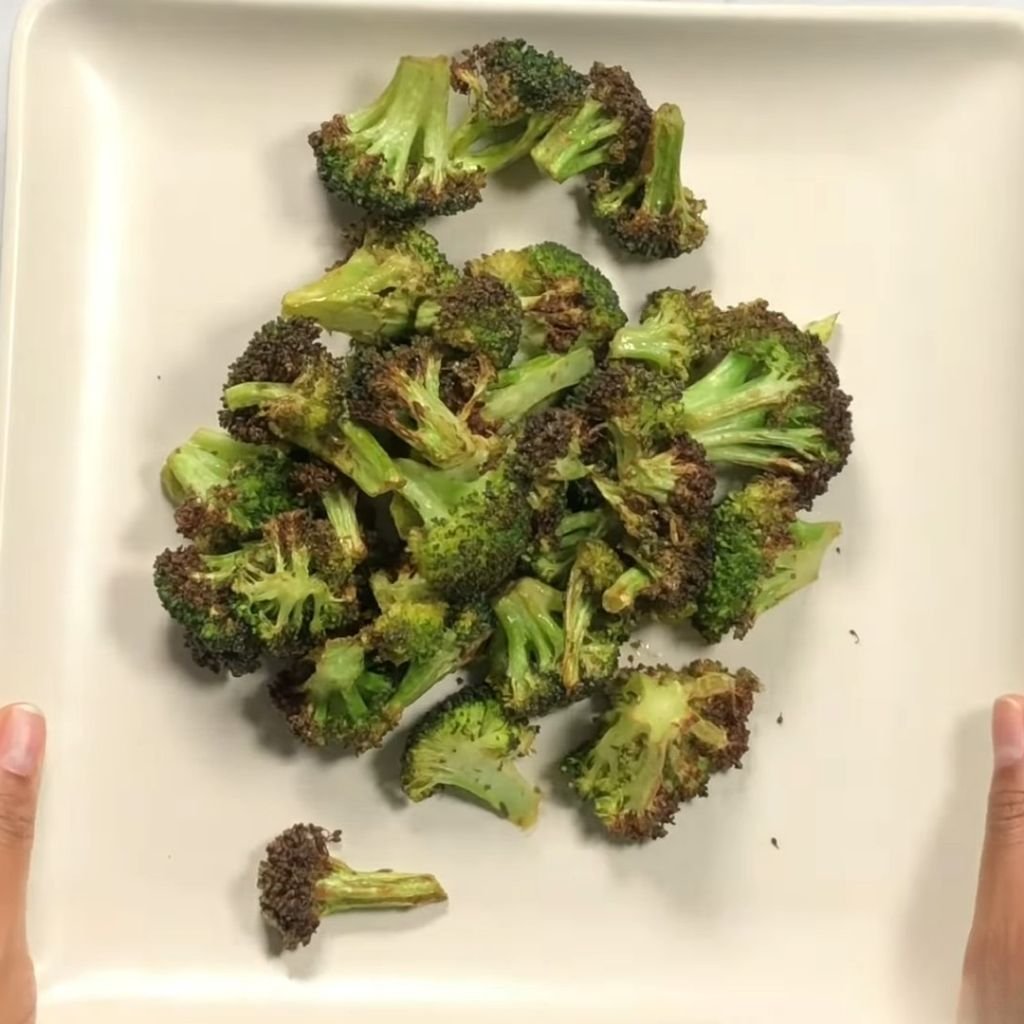
20. Air Fryer Broccoli
Prep Time: 5 minutes | Cook Time: 8–10 minutes | Serve: 4 servings
Roasted broccoli with crispy edges and a slightly charred, nutty flavor is one of those side dishes that converts even the pickiest vegetable skeptics. Made quickly in your Bella air fryer, this simple preparation brings out the natural sweetness of the broccoli and makes it irresistible alongside any main dish.
Ingredients:
- 1 large head of broccoli, cut into florets
- 2 tablespoons olive oil
- 3 cloves garlic, minced
- ½ teaspoon salt
- ¼ teaspoon black pepper
- ¼ teaspoon red pepper flakes (optional)
- Lemon juice and Parmesan for serving
Instructions:
Wash the broccoli head under cold running water and dry it very well with a clean kitchen towel or paper towels. Wet broccoli will steam in the air fryer rather than roast, so thorough drying is essential. Cut the broccoli into florets that are similar in size — about 1½ to 2 inches each. If any florets are large and flat, trim the stems so they stand up more evenly.
Place the broccoli florets in a large mixing bowl. Drizzle the olive oil over the top and add the minced garlic, salt, black pepper, and red pepper flakes if using. Toss everything together well until all the florets are lightly and evenly coated with oil and seasoning. Every floret should glisten with a light coating of oil.
Preheat your Bella air fryer to 400°F (200°C). Add the seasoned broccoli florets to the basket in a single layer. It is fine if they touch lightly, but avoid piling them on top of each other — they need airflow all around to roast properly rather than steam.
Cook at 400°F for 8 to 10 minutes, shaking the basket halfway through at the 4 or 5-minute mark to redistribute the florets and ensure even browning. The broccoli is ready when the tips of the florets are slightly charred and the stems are tender when pierced with a fork. Immediately after removing from the air fryer, squeeze a little fresh lemon juice over the top and sprinkle with grated Parmesan cheese if desired. Serve right away.
21. Air Fryer Brussels Sprouts
Prep Time: 8 minutes | Cook Time: 12–15 minutes | Serve: 4 servings
Crispy on the outside and tender in the middle, these air fryer Brussels sprouts might just change your mind about this vegetable completely. The Bella air fryer caramelizes the natural sugars in the sprouts beautifully, giving them a slightly sweet, nutty flavor that is far removed from the mushy, bitter versions you may have had in the past.
Ingredients:
- 1 pound Brussels sprouts, trimmed and halved
- 2 tablespoons olive oil
- ½ teaspoon garlic powder
- ½ teaspoon salt
- ¼ teaspoon black pepper
- Optional: 2 tablespoons balsamic glaze or crumbled bacon for serving
Instructions:
Wash the Brussels sprouts under cold running water. Trim off the rough, woody end of each stem and remove any outer leaves that look yellowed or damaged. Slice each sprout in half from top to bottom through the stem. Halving them creates a flat cut surface that gets wonderfully caramelized and golden in the air fryer.
Place the halved Brussels sprouts in a large bowl and drizzle with olive oil. Season with garlic powder, salt, and black pepper. Toss everything together until every cut surface and outer leaf is coated with oil and seasoning. Make sure the oil reaches all the way into the inner layers.
Preheat your Bella air fryer to 375°F (190°C). Place the Brussels sprouts in the basket with the cut side facing down whenever possible. This ensures the flat side gets direct contact with the hot basket surface and develops the best caramelized crust.
Cook at 375°F for 10 minutes. Open the basket and toss or flip the sprouts using tongs. Spread them back out and cook for another 3 to 5 minutes until the outer leaves are crispy and lightly charred and the cut sides are deeply golden. Taste one and add more salt and pepper if needed. Transfer to a serving bowl and drizzle with balsamic glaze or top with crumbled crispy bacon for an extra layer of flavor.
22. Air Fryer Zucchini Fries
Prep Time: 10 minutes | Cook Time: 10–12 minutes | Serve: 4 servings
Crispy zucchini fries with a Parmesan and breadcrumb coating are a lighter and more exciting alternative to regular potato fries. The Bella air fryer gets them perfectly golden and crunchy on the outside while keeping the inside soft and tender. Serve them as a side dish or snack with marinara or ranch for dipping.
Ingredients:
- 2 medium zucchini
- ½ cup grated Parmesan cheese
- ½ cup panko breadcrumbs
- 1 teaspoon garlic powder
- ½ teaspoon Italian seasoning
- ½ teaspoon salt
- 2 eggs, beaten
- Cooking spray
Instructions:
Wash the zucchini and pat them dry. Trim off both ends and cut each zucchini in half crosswise, then slice each half into sticks about ½ inch wide. Aim for sticks that are roughly the same size so they cook evenly. Lay the cut sticks on a layer of paper towels and pat the tops dry as well, since zucchini contains a lot of moisture.
In a shallow bowl, combine the grated Parmesan, panko breadcrumbs, garlic powder, Italian seasoning, and salt. Mix them together until evenly combined. In a separate bowl, beat the eggs.
Dip each zucchini stick into the beaten egg first, letting the excess drip off. Then roll it in the Parmesan breadcrumb mixture, pressing gently so the coating adheres well to all sides. Place the coated sticks on a plate as you finish them.
Preheat your Bella air fryer to 400°F (200°C). Spray the basket with cooking spray and arrange the zucchini fries in a single layer. Do not crowd the basket — cook in two batches if needed. Spray the tops of the fries generously with cooking spray.
Cook at 400°F for 5 to 6 minutes, then carefully flip each fry using tongs. Spray the other side lightly with cooking spray. Cook for another 5 to 6 minutes until the coating is deeply golden and crispy. Zucchini fries are best served immediately while they are still hot and crunchy. Serve with marinara sauce, ranch dressing, or garlic aioli for dipping.
23. Air Fryer Sweet Potato Fries
Prep Time: 10 minutes | Cook Time: 15–18 minutes | Serve: 4 servings
Sweet, slightly caramelized, and beautifully crispy at the edges, these Bella air fryer sweet potato fries are a nutritious and delicious upgrade from regular fries. With natural sweetness from the sweet potatoes and a hint of smoky seasoning, these fries are satisfying enough to eat on their own or alongside burgers and sandwiches.
Ingredients:
- 2 large sweet potatoes
- 1 tablespoon olive oil
- 1 teaspoon cornstarch
- ½ teaspoon paprika
- ½ teaspoon garlic powder
- ½ teaspoon salt
- ¼ teaspoon black pepper
Instructions:
Peel the sweet potatoes and cut them into even sticks about ¼ inch wide and 3 to 4 inches long. Consistent sizing is very important — thicker fries will not get as crispy and will take longer to cook, while thin ones can burn quickly. Place the cut fries into a large bowl filled with cold water and let them soak for 20 to 30 minutes. Soaking draws out excess starch, which helps the fries get crispier in the air fryer.
After soaking, drain the sweet potato fries and spread them out on a clean kitchen towel. Pat them completely dry on all sides. This step is crucial — wet fries will steam instead of crisp up and you will end up with soft, limp results.
Place the dried fries back in the large bowl. Add the olive oil and cornstarch and toss together. The cornstarch creates a light coating on the outside of each fry that becomes extra crispy during cooking. Add the paprika, garlic powder, salt, and black pepper and toss again until evenly coated.
Preheat your Bella air fryer to 380°F (193°C). Place the fries in the basket in a single, even layer. Do not pile them — work in batches to avoid crowding. Cook for 8 minutes, then shake the basket well to turn the fries. Cook for another 7 to 10 minutes until the edges are caramelized and the fries are tender inside. Some light charring on the edges is perfectly normal and adds flavor. Remove and season with a pinch of extra salt right away.
24. Air Fryer Cauliflower Bites
Prep Time: 10 minutes | Cook Time: 15–18 minutes | Serve: 4 servings
Roasted cauliflower bites with a golden, slightly crispy exterior and a tender, flavorful center are a fantastic plant-based snack or side dish. The Bella air fryer roasts them quickly and evenly, developing rich flavor from caramelization that you just cannot get by steaming or boiling cauliflower.
Ingredients:
- 1 medium head of cauliflower, cut into bite-sized florets
- 2 tablespoons olive oil
- 1 teaspoon garlic powder
- 1 teaspoon smoked paprika
- ½ teaspoon cumin
- ½ teaspoon salt
- ¼ teaspoon black pepper
- Optional: hot sauce or ranch for dipping
Instructions:
Cut the cauliflower head into small, even florets that are roughly 1½ to 2 inches in size. Wash them under cold water and dry them very thoroughly with a kitchen towel. As with most vegetables cooked in the air fryer, moisture is the enemy of crispiness.
In a large bowl, combine the cauliflower florets with olive oil, garlic powder, smoked paprika, cumin, salt, and black pepper. Toss everything together until every floret is evenly coated in oil and spice. Make sure the seasoning gets into all the nooks and crannies of the cauliflower.
Preheat your Bella air fryer to 400°F (200°C). Transfer the seasoned cauliflower to the basket in a single layer. Some touching is acceptable, but try to avoid large piles. Cook at 400°F for 15 to 18 minutes total, shaking or stirring the basket every 5 to 6 minutes to make sure all sides get exposed to the heat. The cauliflower is done when the edges and tips are golden and caramelized and the florets are fork-tender throughout. Taste and adjust seasoning as needed. Serve immediately with your choice of dipping sauce.
25. Air Fryer Apple Chips
Prep Time: 10 minutes | Cook Time: 15–20 minutes | Serve: 2–4 servings
Thin, naturally sweet apple chips with a light sprinkle of cinnamon sugar make for a wholesome snack that satisfies a sweet tooth without any guilt. Made in your Bella air fryer with just two or three ingredients, these chips crisp up beautifully and make a perfect after-school snack or healthy dessert alternative.
Ingredients:
- 2 large apples (any variety — Fuji, Honeycrisp, or Gala work well)
- 1 teaspoon cinnamon
- 1 tablespoon sugar (optional)
Instructions:
Core the apples and slice them as thinly and evenly as possible, about ⅛ inch thick. A mandoline slicer is ideal for this since it creates perfectly uniform slices that all cook at the same rate. If you do not have a mandoline, use a very sharp knife and take your time to get the slices as even as you can. Uneven slices mean some will burn while others are still underdone.
In a small bowl, mix the cinnamon and sugar together. Lay the apple slices out on a clean surface and sprinkle the cinnamon sugar mixture lightly over both sides of each slice. You can skip the sugar if you want a more naturally sweet chip — the apples will still taste delicious with just cinnamon.
Preheat your Bella air fryer to 300°F (150°C). Arrange the apple slices in the basket in as flat and single a layer as possible. Because the slices are thin, they may overlap slightly, but try to keep them as separated as you can for even crisping.
Cook at 300°F for 15 to 20 minutes, checking and flipping the slices every 5 minutes. The low temperature is intentional — it allows the apple slices to dry out slowly and become crispy without burning. The chips are done when they feel dry and slightly firm to the touch. They will continue to crisp up as they cool. Remove from the basket and let them rest on a wire rack for 10 minutes before eating. Store any leftovers in an airtight container at room temperature for up to 2 days.
26. Air Fryer Cinnamon Sugar Donuts
Prep Time: 15 minutes | Cook Time: 8–10 minutes | Serve: 8 donuts
Warm, pillowy donuts rolled in cinnamon sugar right out of the Bella air fryer are a genuine crowd favorite. Made with refrigerated biscuit dough for a simple shortcut, these donuts have a tender, cake-like texture inside and a sweet, fragrant coating that makes the whole kitchen smell amazing.
Ingredients:
- 1 can (8-count) refrigerated biscuit dough
- 4 tablespoons unsalted butter, melted
- ½ cup granulated sugar
- 1½ teaspoons cinnamon
- Cooking spray
Instructions:
Open the can of refrigerated biscuit dough and separate all 8 biscuits. Place them on a clean surface. Using a small round cookie cutter, bottle cap, or even your thumb, cut or press a small hole in the center of each biscuit to create the classic donut shape. Set aside the cut-out centers — these can be cooked as donut holes.
In a small bowl, mix together the sugar and cinnamon until evenly combined. Set this aside for coating the donuts after they cook. Melt the butter and have it ready in a separate small bowl for brushing.
Preheat your Bella air fryer to 350°F (175°C). Spray the basket lightly with cooking spray. Place the shaped donuts into the basket in a single layer with some space between them. Depending on the size of your air fryer, cook in two rounds.
Cook at 350°F for 4 minutes, then open the basket and carefully flip each donut using tongs. Cook for another 4 to 5 minutes until the donuts are golden on both sides and cooked through. They should spring back lightly when pressed in the center.
While the donuts are still hot, brush each one generously with the melted butter, coating all sides. Then immediately roll each buttered donut in the cinnamon sugar mixture, pressing lightly so the sugar sticks all over. Eat them warm for the best experience — the outside is slightly crunchy with sugar and the inside is soft and tender.
27. Air Fryer Chocolate Chip Cookies
Prep Time: 10 minutes | Cook Time: 8–10 minutes per batch | Serve: 12 cookies
Soft, chewy chocolate chip cookies with golden edges and melty chocolate throughout are absolutely achievable in your Bella air fryer. No need to heat up the entire oven — these cookies bake up beautifully in batches in just minutes, making them the easiest homemade cookie you can put together on a weeknight.
Ingredients:
- 1¼ cups all-purpose flour
- ½ teaspoon baking soda
- ¼ teaspoon salt
- ½ cup unsalted butter, softened
- ½ cup granulated sugar
- ¼ cup packed brown sugar
- 1 large egg
- 1 teaspoon vanilla extract
- 1 cup semi-sweet chocolate chips
Instructions:
In a medium bowl, whisk together the flour, baking soda, and salt. Set this dry mixture aside. In a separate large bowl, use a hand mixer or wooden spoon to beat the softened butter with the granulated sugar and brown sugar until the mixture is light and creamy, about 2 to 3 minutes. Add the egg and vanilla extract and mix until fully incorporated.
Gradually add the flour mixture to the butter mixture, stirring gently until just combined. Do not overmix — overworked dough leads to tough cookies. Fold in the chocolate chips until they are evenly distributed throughout the dough. Cover the dough and refrigerate it for at least 20 minutes. Chilling the dough helps the cookies hold their shape better during baking rather than spreading flat.
Preheat your Bella air fryer to 325°F (163°C). Cut a piece of parchment paper to fit the inside of the basket. Lightly spray the parchment with cooking spray. Scoop the chilled dough into balls about 1½ tablespoons each and place them on the parchment paper in the basket with at least 1 inch of space between them. Cook 3 to 4 cookies at a time depending on the size of your basket.
Cook at 325°F for 8 to 10 minutes. The cookies are done when the edges look set and lightly golden, but the centers may still look slightly soft and underdone — this is exactly right. They will firm up significantly as they cool. Remove the parchment paper with the cookies on it from the basket and let them cool on a flat surface for at least 5 minutes before eating. Repeat with the remaining dough. Store cooled cookies in an airtight container for up to 4 days.
28. Air Fryer Baked Apples
Prep Time: 10 minutes | Cook Time: 15–18 minutes | Serve: 4 servings
Tender, warm baked apples filled with a brown sugar, cinnamon, and oat stuffing make for a comforting dessert that feels indulgent without being heavy. The Bella air fryer does a beautiful job of softening the apple completely while the filling caramelizes into something deeply fragrant and delicious.
Ingredients:
- 4 medium apples (Granny Smith, Fuji, or Honeycrisp)
- 4 tablespoons unsalted butter, divided
- 4 tablespoons brown sugar
- 4 tablespoons rolled oats
- 1 teaspoon cinnamon
- ¼ teaspoon nutmeg
- Vanilla ice cream or whipped cream for serving
Instructions:
Wash the apples and dry them well. Using a paring knife or apple corer, carefully remove the core from each apple, creating a well that is about 1 inch wide and goes almost all the way through to the bottom but not completely through. Leave about ½ inch of apple at the base so the filling stays inside and does not leak out through the bottom during cooking.
In a small bowl, combine the brown sugar, rolled oats, cinnamon, and nutmeg. Mix them together until evenly combined. This mixture will form the filling for each apple.
Fill each apple cavity with about one tablespoon of the brown sugar and oat mixture, pressing it in gently. Top each filled apple with one tablespoon of butter, either as a whole tablespoon placed right on top or cut into small pieces and distributed evenly over the filling. The butter melts down into the filling as the apple cooks and creates a rich, caramel-like sauce.
Preheat your Bella air fryer to 350°F (175°C). Place the filled apples upright in the basket. They should stand on their own without tipping. Cook at 350°F for 15 to 18 minutes. The apples are done when the skin looks wrinkled and the flesh is completely tender when pierced with a skewer or thin knife. The filling should be bubbling and caramelized at the top. Carefully remove the apples from the basket and place them in individual bowls. Top each apple with a scoop of vanilla ice cream or a dollop of whipped cream before serving.
29. Air Fryer Peach Crisp
Prep Time: 10 minutes | Cook Time: 15–18 minutes | Serve: 4 servings
Juicy, warm peaches topped with a buttery, golden oat crumble is one of the most comforting desserts of the summer season, and the Bella air fryer makes it simple to prepare whenever the craving strikes. Using fresh or canned peaches, this fruit crisp comes together in minutes and tastes like something from a bakery.
Ingredients:
- 3 cups sliced peaches (fresh or canned, drained well)
- 1 tablespoon sugar
- ½ teaspoon cinnamon
- ½ cup rolled oats
- ¼ cup all-purpose flour
- ¼ cup brown sugar
- 3 tablespoons cold unsalted butter, cut into small cubes
- Pinch of salt
- Vanilla ice cream or whipped cream for serving
Instructions:
If using fresh peaches, peel, pit, and slice them. If using canned peaches, drain all the liquid from the can and pat the slices dry with paper towels. Excess liquid from canned peaches will make the crisp watery rather than syrupy and flavorful.
In a bowl, toss the peach slices with one tablespoon of sugar and ½ teaspoon of cinnamon. Stir gently to coat all the peach pieces evenly. Transfer the seasoned peaches into a small baking dish or an oven-safe pan that fits inside your Bella air fryer basket. If you do not have a small pan, you can use individual ramekins.
In a separate bowl, make the crumble topping. Combine the rolled oats, flour, brown sugar, and a pinch of salt. Add the cold butter pieces and use your fingertips to rub the butter into the dry ingredients until the mixture looks like coarse, uneven crumbles with some pea-sized butter pieces remaining. Do not overmix — the uneven texture is what creates the distinct crispy crumble on top.
Spread the crumble topping evenly over the peach layer in the baking dish. Preheat your Bella air fryer to 350°F (175°C) and carefully place the baking dish inside the basket. Cook at 350°F for 15 to 18 minutes until the topping is golden and crispy and the peach filling is bubbling around the edges. Let it cool for 5 minutes before serving, then scoop into bowls and top with vanilla ice cream.
30. Air Fryer Banana Dessert Bites
Prep Time: 10 minutes | Cook Time: 8–10 minutes | Serve: 4 servings
Sweet, caramelized banana bites with a crispy exterior and a warm, soft center are a simple, two-ingredient dessert that feels much more special than the effort required. The natural sugars in the banana caramelize beautifully in the Bella air fryer, creating a golden outside that is soft, almost pudding-like inside.
Ingredients:
- 3 ripe but firm bananas
- 2 tablespoons butter, melted
- 2 tablespoons brown sugar
- ½ teaspoon cinnamon
- Optional: crushed graham crackers or shredded coconut for coating
- Vanilla ice cream or caramel sauce for serving
Instructions:
Choose bananas that are ripe and yellow with perhaps a few small spots, but not overly soft or mushy. Very ripe bananas will become too soft during cooking and may not hold their shape as well. Peel the bananas and slice them into rounds about ¾ to 1 inch thick. Thicker slices hold up better and give you a more satisfying bite.
In a small bowl, mix together the brown sugar and cinnamon. Place the banana slices in a bowl and drizzle with the melted butter. Toss gently so all the slices are lightly coated. Then sprinkle the cinnamon sugar mixture over the banana slices and toss again gently. If you want to add a coating, gently press each slice into crushed graham crackers or shredded coconut at this point.
Preheat your Bella air fryer to 375°F (190°C). Lightly spray the basket with cooking spray. Arrange the banana bites in a single layer in the basket, making sure they are not touching each other. Cook at 375°F for 4 minutes, then open the basket and carefully flip each banana slice using a soft spatula. Bananas are delicate and break apart easily, so handle them gently.
Cook for another 4 to 6 minutes. The bites are done when the cut surfaces are deeply caramelized and golden and the banana feels soft when pressed gently. The coating, if used, should be lightly toasted and golden. Remove carefully from the basket and serve immediately in bowls topped with a scoop of vanilla ice cream and a drizzle of caramel sauce. These are best enjoyed right away while warm, as the banana will soften more as it sits.
Bella Air Fryer Cooking Time and Temperature Chart
Knowing the right temperature and time takes the guesswork out of cooking with your Bella air fryer. Use this chart as a general guide, and always check doneness with a meat thermometer or by testing texture before serving:
1. Chicken — Chicken breasts and thighs cook best between 375°F and 400°F. Breasts typically need 18 to 22 minutes while thighs need 22 to 26 minutes. Wings and drumsticks do well at 380°F for 22 to 28 minutes. Always confirm an internal temperature of 165°F before serving.
2. Seafood — Salmon fillets cook well at 400°F for 10 to 12 minutes. Shrimp cook very quickly at 400°F in just 6 to 8 minutes. Fish fillets such as cod or tilapia need 12 to 14 minutes at 400°F. Coconut shrimp works well at 375°F for 8 to 10 minutes.
3. Vegetables — Most vegetables roast well at 375°F to 400°F. Broccoli and cauliflower take 8 to 15 minutes. Brussels sprouts need 12 to 15 minutes. Sweet potato fries do best at 380°F for 15 to 18 minutes. Shake the basket halfway through for even roasting.
4. Frozen Foods — Frozen mozzarella sticks, onion rings, and similar items cook well at 375°F to 390°F for 8 to 12 minutes. Frozen vegetables usually need 10 to 15 minutes at 400°F. Always flip or shake at the halfway point.
5. Desserts — Apple chips dry out slowly at a lower 300°F for 15 to 20 minutes. Donuts and banana bites do well at 350°F to 375°F for 8 to 10 minutes. Cookies bake at 325°F for 8 to 10 minutes. Fruit crisps and baked apples cook at 350°F for 15 to 18 minutes.
Conclusion
From golden breakfast potatoes to crispy chicken wings to warm baked apple desserts, these Bella air fryer recipes prove just how many incredible meals you can make with one compact, easy-to-use appliance. The Bella air fryer truly shines when it comes to delivering crispy, flavorful results with a fraction of the oil and cooking time that traditional methods require.
Do not be afraid to experiment with different seasonings, sauces, and ingredients once you feel comfortable with the basics. Swapping out spices, trying new vegetables, or adding different proteins is a great way to keep meals exciting and make each recipe your own. The beauty of using a Bella air fryer is that it is so forgiving and consistent that experimentation rarely leads to disappointing results.
For the best results every time, remember a few key tips: always pat ingredients dry before cooking, avoid overcrowding the basket, preheat your air fryer before adding food, and use cooking spray or a light coat of oil on breaded items.
When in doubt, check doneness a couple of minutes early and add time as needed rather than overcooking. With these Bella air fryer recipes as your starting point, crispy, delicious, and satisfying home-cooked meals are always just minutes away.